• If you need help identifying a pepper, disease, or plant issue, please post in Identification.

greenhouse Small indoor greenhouse almost done!

857b2e9d2f4515722d2720272b97341b.jpg

 
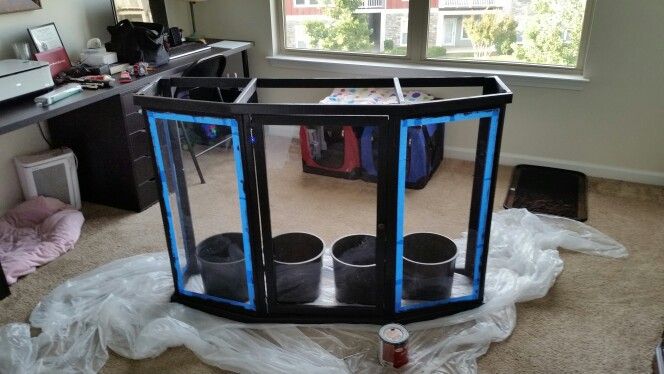
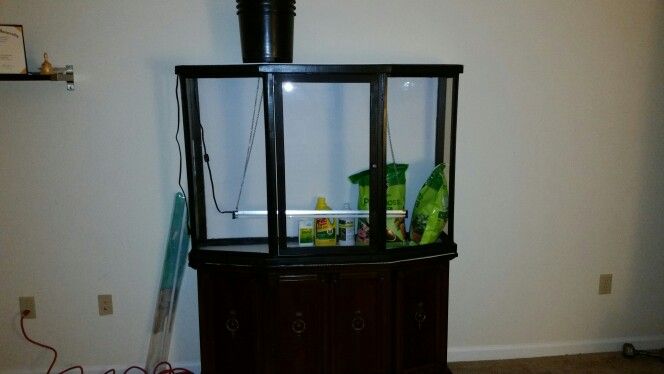
Picture is to show the interior size. four #3 pots fit nicely inside, just as planned!!
 
Haha, alright! I've been building this off and on for a little while now, basically on days off and when I have free time. I'm finally to the point where it is taking shape and it is in the final stages. The hardest part was cutting and building the frame. Basically, we have this cabinet with an odd shape with angles (front angle degrees (corners) 109, 111, (front corners) 161, 159).The cabinet is extremely old and was hand built, so it isn't 100% perfect on all sides which made it hard to measure and cut. To make things harder, I live in an apartment and the only cutting tool I have is a jig saw. Every single angle and cut was done freehand. I used cheap slat wood, 1 inch wide by 1/2 thick.
 
The next challenge was joining all the wood together, especially the weird angles. I also don't have a pocket hole tool so I also did this freehand. The outside odd angles were easy enough, but the front top and bottom frame work was a PITA. The wood kept splintering apart so I ended up taking the front parts, drilling holes in them, glueing little wooden dowels into the holes, then fitting them into matching pilot holes on the oddly angled front. I did have to use some wood putty to fix a couple holes from the initial attempt. Anyway, I, of course, pilot holed, screwed and glued the rest together and then attached the top and bottom frames with those legs you see. After much sanding and filling in staple holes and blemishes, I painted the thing.
 
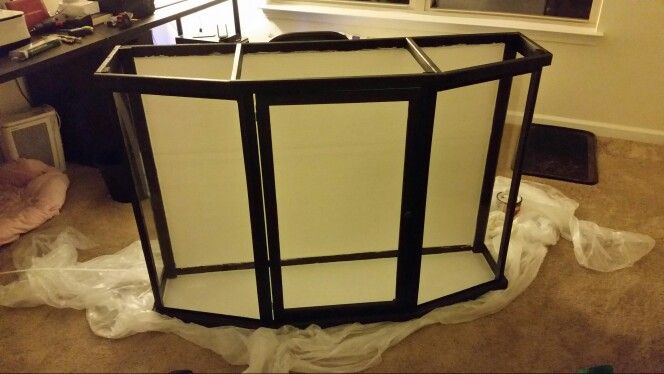
The next hurdle to jump was enclosing the whole darn thing. I found this plastic board stuff that was stupid cheap at home depot and cut it to fit to the top and bottom, then got another piece for the back. I had some plexiglass left over, so I reused that (and had to get a couple more panels of it). The jigsaw was too risky to use on this stuff, so I brought it to my girl's brother in law's house and used his table saw (I was trying to do everything 100% on my own but alas, it was not meant to be). I was going to use silicone to affix the plexiglass panels (I have fixed aquariums many times so this was no worry) but my girlfriend was not fond of being able to see the silicone. So back to home depot I go and I found this plastic J track stuff for cheap that fit around the edges of the plexiglass perfectly. I cut it and framed in all the plexiglass, then used kitchen caulking compound to stick it to the frame. It is waterproof and was like 3 bucks and stuck well to everything. I let it all dry, then I painted them the same color as the frame.
 
I then built the door, which was also really easy. Just measured it out, screwed and glued, then attached the hinges and the knob, then attached plexiglass to the inside of the door frame with screws (you can't see it). Painted it then put it on. Woo! Hard work is done!
 
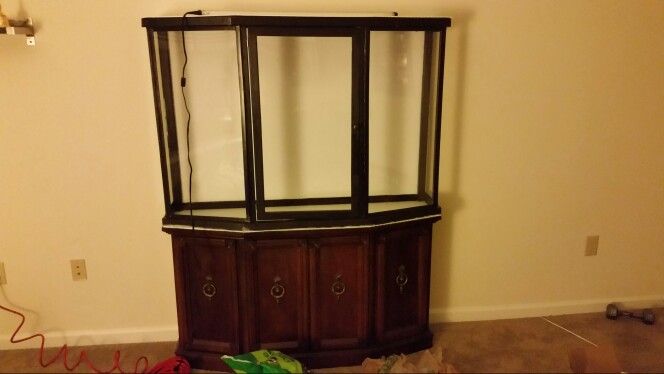
Today I attached the plastic board bottom (framing nails and the caulk) and removed the tape. The last few steps are as follows:
 
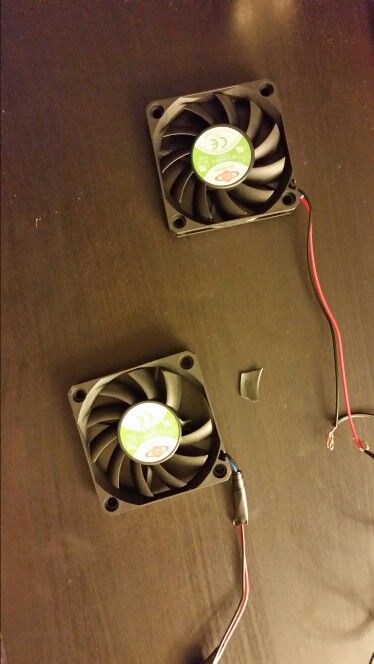
1) Wire the computer case fans to plug into the wall (easy)
 
2) Cut openings in the plastic board and mount fans for airflow (easy)
 
3) Affix back and top plastic panels (easy)
 
4) Hang my light (easy)
 
5) FINALLY start growing peppers away from aphids and other pests! (I have to have the pots enclosed because my idiot cats like to dig in dirt and go to the bathroom in plant pots).
 
I was going to build a square greenhouse out of PVC and plexiglass but my girlfriend freaked because she wanted the thing to be "aesthetically pleasing". My only goal was to get something growing indoors. All in all, has not been an expensive project. The wood was like 25 bucks. The plastic board only cost like 20 bucks. The extra plexiglass was 40. The paint was 12. The plastic framing, 10. The caulking 3, the knob, hinges and magnet, 6. Everything else (wood putty, dowels, screws, nails) were all sitting in my toolboxes, leftover from a time when I had more room to do projects. There are a few other things that I needed (lights, pots, grow medium, etc) but all in all, not bad for something way more grandiose than I was planning!
 
Thank you! I bought a single Sunblaster 3ft T5 ballast/light fixture to hang from the crossbeams on the top. Once it comes in and I figure out where to put the screws to hang it from, I can put the top on and seal it up. After doing a bunch of research, I will likely end up getting two more of these T5 fixtures in the near future. http://www.amazon.com/gp/product/B00AKKUNIY/ref=oh_aui_detailpage_o00_s00?ie=UTF8&psc=1
 
I am constrained on internal space so these were the only suitable lights for inside. Anyone have any experience with these?
 
Are you planning on setting up some sort of ventilation? If not, I recommend getting a 4 inch computer fan and setting it up to pull air from the inside at the top. Then cut another 4 inch whole for an "intake" at the bottom corner opposite the corner you set your exhaust up. If the noise is too much you can get a thermostat to control the fan. You can also get cheap variable speed controllers that will work fine. 
 
Air movement is really critical for this kind of setup.
 
I did a lot of going back between LED and the T5s and in the end, I chose the T5s because they emit a little bit of heat that I didn't feel I would get from the LEDs. I am seriously considering building my own LED setup to supplement the T5s. I saw a DIY on here a while back and it looked stupid easy. I figured one project at a time, though! I wanted to get some peppers growing :D ......or I may just be lazy and get 2 more like I planned. I'm still debating haha
 
EZ, I sure am! I bought 2 ball bearing 2.5 inch PC case fans, chopped the wires and wired em up to some .5 amp adapters for air movement in the back panel. Originally, I was going to mount them in the roof of the greenhouse blowing air in for circulation, but after feeling their strength I don't feel they are strong enough to do what I want. I appreciate the input on the 4 inch comp fan sucking air out of the box and I'm definitely going to do that. My only issue is that the larger ball bearing fans are a bit expensive. The reasoning behind using these instead of the traditional sleeve type fans is because they last a lot longer when horizontal. I'm thinking two 4 inch fans in the roof; one on each side of the light fixtures. So, 4 fans total. Your thoughts? Let me know if this seems like it'd be overkill and would vent too much warmth from inside the box.
 
Speaking of fans, when I wired one of the fans today, I was not paying attention and the very tip of my index finger got hit by one of the blades. Sliced me pretty good and snapped a blade right off! Lame. Lesson learned. I am going to see if I can super glue it back on.
 
Thanks man! She is pretty pleased with it. She was initially upset that the paint didn't match the cabinet but there was no effing way I was veneering the exterior, finding the right color and staining it. Color matched the desk across the room so it matches at least something!
 
Dreamweaver said:
Width ok but it looks too narrow...for 2-3 plants you will have to bonchi them and restrict the roots.
I wouldve thought the same but just last week I picked up 2 3 month old plants (Dorset Naga and Chocolate Bhut) which grew in 2.5L pots. Both plants were massive, one's about 2 feet high, nicely branced ot with about 80 flower buds on it already, the other one's a bit smaller. I've ofcourse moved them to much bigger pots now but I never expected to see such decent size plants with flowers coming through in pots that small. This looks like you could easily have 5-8L pots in there easy. I reckon the plants will do just fine dude.
 
Ermergerd, I'm almost done! I had to hang the light and turn it on, just to see how it looked. It was pretty awesome. Tomorrow the nails go into the top frame so I can properly hang the lights and be able to adjust them easily. Also going to properly attach the roof. Going to have to purchase a couple larger PC fans to wire up, the little ones just aren't going to cut it. Too small on their own, not enough air movement. I'm thinking they'd go well in the bottom back corners to get circulation going in conjunction with 2 larger 4 inch fans in the roof.
 
 
14911d5a8df889e6bc8a83b15388a704.jpg

 
I bought 10 feet of wire so I could get everything wired easily, also got that vinyl lining stuff you put in your cabinets. I wanted to make sure the old cabinet was safe, which is why there is still a white line at the bottom. Anyway, the fans and putting the roof on permanently are really the last two things I'll have to do before I'm good to start growing stuff! If this isn't complete by tomorrow, there is something wrong with me. I'll be starting a glog soon to show the process and progress of my 4 plants. I bought a bunch of supplies (dirt for starting seedlings, fish fert, normal liquid fert, sphagnum, perlite) but still need to get some dolomite lime and fine orchid bark to mix the medium. I was thinking of getting some small aquarium rocks for the bottom of the cups and buckets, but I've been thinking it may be good to just skip this and add sand to my medium mix, Thoughts?
 
Just as a reference:
 
 
Bugger gives me an IO error trying to upload lately.
 
http://thehotpepper.com/topic/45084-gotrox-2014-grow/?hl=gotrox
 
Last entry is what 4 plants look like in a similar space.
 
Cut about 1/2 the growth down last month, and a few branches last week.
 
They will need to be agressiv3ly trimmed.
 
They will be root bound and need nutes.
 
But, anything is possible----I have some projects with 3 plants in a 1  gallon flower pot (semi-bonchi) and I get pods from them.


Thank you for this! I'll be making a glog to show progress and such soon as everything sprouts. What nutes do you recommend?
 
Back
Top