When do you eliminate your multiples?

To ensure I have some viable plants I started lots of seeds. As I got better at germination I got more seedlings. I now have multiple seedlings and now am beginning to get multiple adolescent plats that I only plan to grow one of.
 
At what stage do you eliminate the unneeded multiple plants?
 
I try to split mine when I pot them up from peat pellets.  I like to have back up plants because I'm clumsy.  This year I will probably use a few for Kratky experiments.  
 
 Like rghm1u20, I try to find homes for extras when it is time to plant out.  'Exotic' peppers are great for trading... and you might help spread the hobby.   :dance:   
 
I only cull once the plants start to crowd each other and I have run out of room for more plants.  At that point, I pick the strongest 2 and give the rest to people who are willing to take them.  I generally start asking people in January if they'd like a pepper plant once I start giving them away.  By the time I start culling in February/March, I usually have several people ready to take the extras off my hands.
 
For example, I planned to grow two Brazilian Starfish this season.  All 8 of the seeds I planted are up and ridiculously healthy.  They're over twice the size of everything else that started the same time and they have thick stems, so I'd feel bad just throwing them away.  I started asking people two weeks ago if they wanted one and all of the extras are already spoken for.  (Better yet, a lot of these people love growing the things but don't eat them, so I end up with all of their peppers as well!)
 
EDIT:  As to when I split plants, that happens when their first set of true leaves is out and spread, usually when the 2nd true set is out or at least popping up as a node.  I plant two seeds per tiny solo cup and pot them up into full size cups before their roots can grow together too much.  If I can't find happy homes for all my plants by springtime, I just set them out near the street because I'm in the ghetto and anything near the street gets swiped by somebody within an hour.
 
I normally separate out the seedlings after the second set of leaves are open, so I can scope out which plants I like the look of and want to keep, and which to give away. 
 
rghm1u20 said:
Eliminate - you mean to toss them? Better give them to others. I eliminate usually by giving away. It means, when ready to move them to the garden.
Same for me. I pot them all up in small cups and give them away when they have 6-8 sets of leaves. This means by then you definitely know which one to keep.
 
Given the frequent death and destruction nature (and my not infrequent stupidity) bring to my plants, I try hard to honor any survivors with a 'chance to live.' ;)
 
In a big city, giveaways are as easy as posting on the FB gardening page.  With luck, I can sometime extract some beer money from the person taking the plant!
 
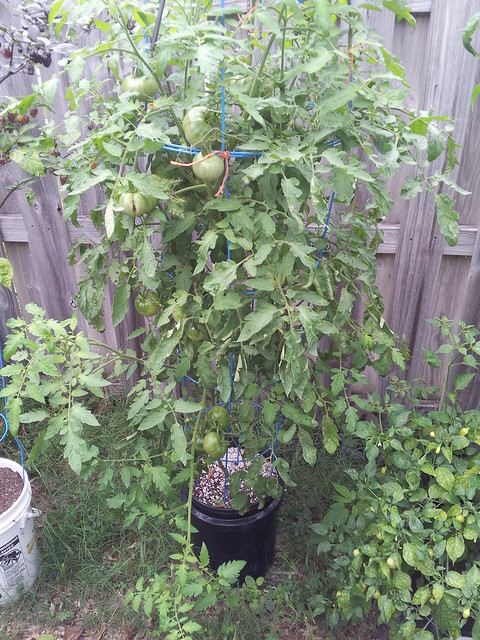
This was an early tomato, but you can see peppers reaching over into the pic on the left hand side. 
.
31537584976_69a0fe8c97_z.jpg

.
.
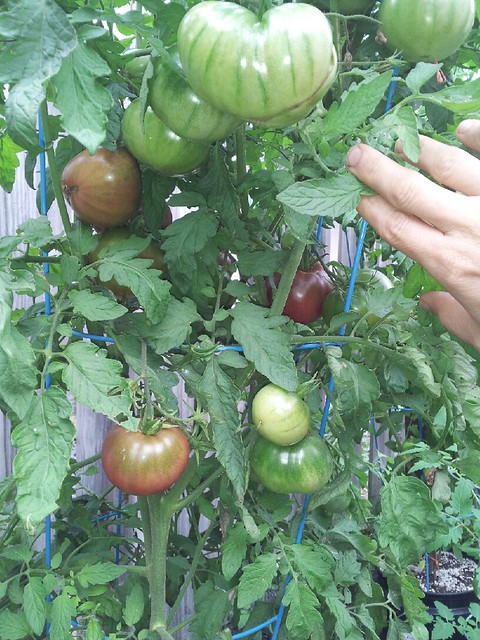
Good yields
.
31086771093_f55da43142_z.jpg

.
.
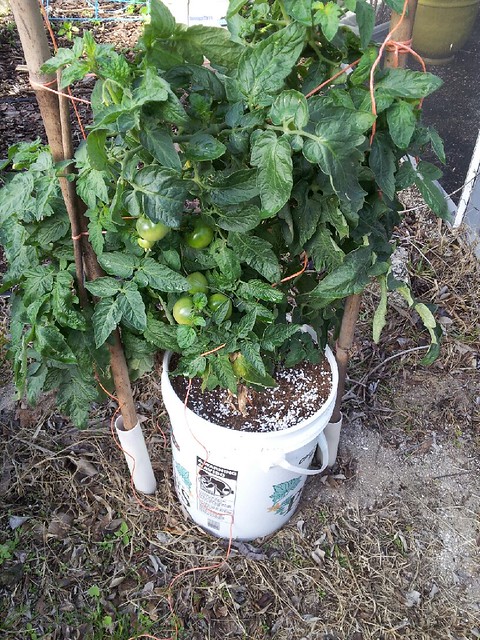
A current crop (taken today).  Most of my peppers are a bit shocked right now, as we've had a few days in the 50's, and nights in the 40's.
.
31766537104_c14c37b4c3_z.jpg

.
.
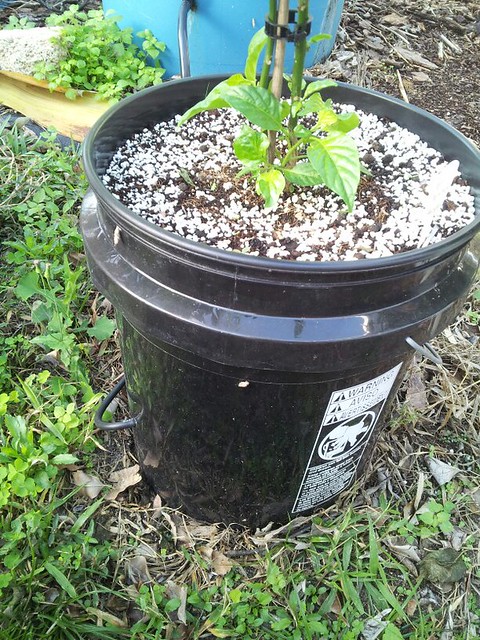
Red Dominican Habanero. You can see the plumbing line at the bottom left.  It comes in just above the perlite at the bottom of the bucket, and has a 2GPH flow reducer on it.  I put it on the inside, so that that it becomes a friction connector. (it's tight in the drilled hole when assembled)
.
32456709782_26121e40de_z.jpg

.
.
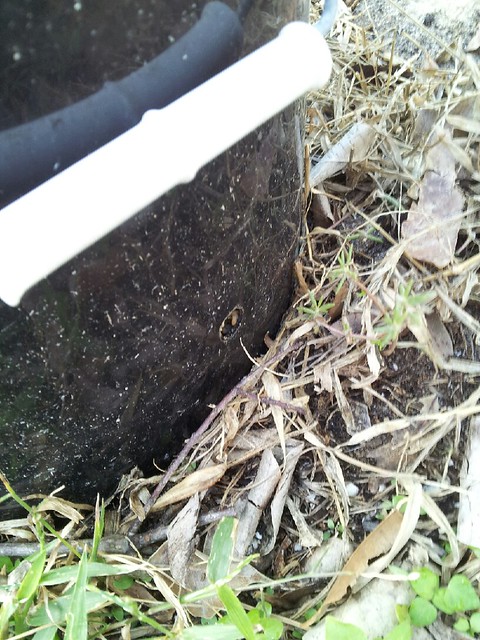
1/2 Inch drain hole.  About 3-3.5 inches above the bottom of the bucket. (measured from the outside)
.
31766537914_6311645032_z.jpg

.
.
The method is simple.   I drill 2 holes - 1 about 3.5" from the bottom of the bucket (on the outside), and another about a half inch above that one, on the opposite side.  Hole #1 is 1/2" diameter, and is a drain.  Hole #2 is just slightly bigger than the drip tubing, and is a feed line.
.
After drilling, a layer of perlite is added, until it's about an inch above the drain hole.  Then, atop that, the rest of the container is filled with a mixture, as follows: 3 part coco coir, 1 part perlite, 1 part worm castings OR aged rabbit manure. (fresh rabbit manure, if that is all that is available.
.
I feed every other time with nutrient, typically, and plain water via the irrigation system, the rest of the time.
.
Nutrient is homemade fertilizer.  However, Neptune's Harvest tomato and veg formula works well, and I did a very successful experiment with the CNS17 Grow. 
 
By the way, the blue container in the background of one of the pictures above, is a 55 gallon version of the same.  I don't actually like the bigger containers, because the mix gets, and stays cold.  Those poly containers really do a good job of stabilising temps, but not always favorably.  I find that smaller containers make better use of nutrients on a single season grow.  That being said, the bigger containers are way better for multiple plants, or big, multi-season plants.
 
Cool that looks really simple and easy to set up. So I'm guessing the perlite in the bottom is always wet and acts as a water/nute reservoir? Do you have to worry about the roots on the bottom rotting from staying it water too long or the water in there going stale?

Cheers
 
Jase4224 said:
Cool that looks really simple and easy to set up. So I'm guessing the perlite in the bottom is always wet and acts as a water/nute reservoir? Do you have to worry about the roots on the bottom rotting from staying it water too long or the water in there going stale?

Cheers
 
It's not as wet as you think it would be.  It is usually bone dry within 2-3 days.  No, I don't worry about rotting roots.  I usually also throw a handful of worms in there, to help clean up.  But I've grown back-to-back-to-back crops in those buckets, and the perform admirably.  Just a flush every now and then.  That is accomplished by putting a cork in the drain hole, and filling it with water.  Pull the plug, and you're back to zero.
 
So I'm thinking the fact that the perlite sits above the drain line this prevents the soil itself from becoming soggy, and the roots that make it to the bottom are sitting in relatively clean water..?
 
This is borrowed from the original "Hempy" bucket concept.  The original design used a bucket full of perlite.  However, using a different media on top, actually creates a reservoir with its own perched water table - the media and the perlite have separate PWTs) - as well as a  more porous air space.  So, the liquid in the bottom will be wicked up to the top while the plants are small, but when the roots penetrate the top media, and hit the perlite layer, the growth goes nuts.  It's a plus/minus relationship, because before the roots hit the perlite, the plant grows like a normal potted plant.  Afterwards, it's more like hydro, and the nutrient/water in the reservoir gets depleted quick, as the plant starts using from the bottom - and hence, more frequent fillings.  But on the other hand, as long as you keep it hydrated, there is always A LOT of air in that root zone.  You know what that means.
.
There is an occasional need to flush the container.  But that is really no big deal.
.
Unlike the original Hempy, this version lends itself very well to organics.
 
Also, you never have to worry about these containers being hard to re-wet if they go dry.  That will never be a problem.
.
Don't worry about the roots being soggy.  They don't stay submerged long.  That is another reason to use the coco coir over the peat - it seems to have much better porosity, and hence the transpiration rate is very good. (or, to put it another way - you'll need to water it more often)
 
I germinate single seeds in soil blocks, so if one fails, it fails - if two seeds go in one block, I snip the stronger seedling after the first true leaves form. But I usually get many more plants than I need and I find clever places all over the yard to plant them, if not in pots. I try to give away excess and if that fails, compost. Usually I can find takers for most everything.
 
Back
Top