sorry for all the posts recently.
I thought I would share a project I did for my wife. I think it would translate well to hydro. The problem was we bought a new house and the bedrooms didn't have lights. They had a switch for an outlet. On the ceiling they had fans which were operated by a chain. The outlet connected to the switch was in a stupid spot. So I made a radio controlled extension cord. Now she can place the light where she wants and turn the light on and off with a remote. I'll talk hardware first and then talk about code.
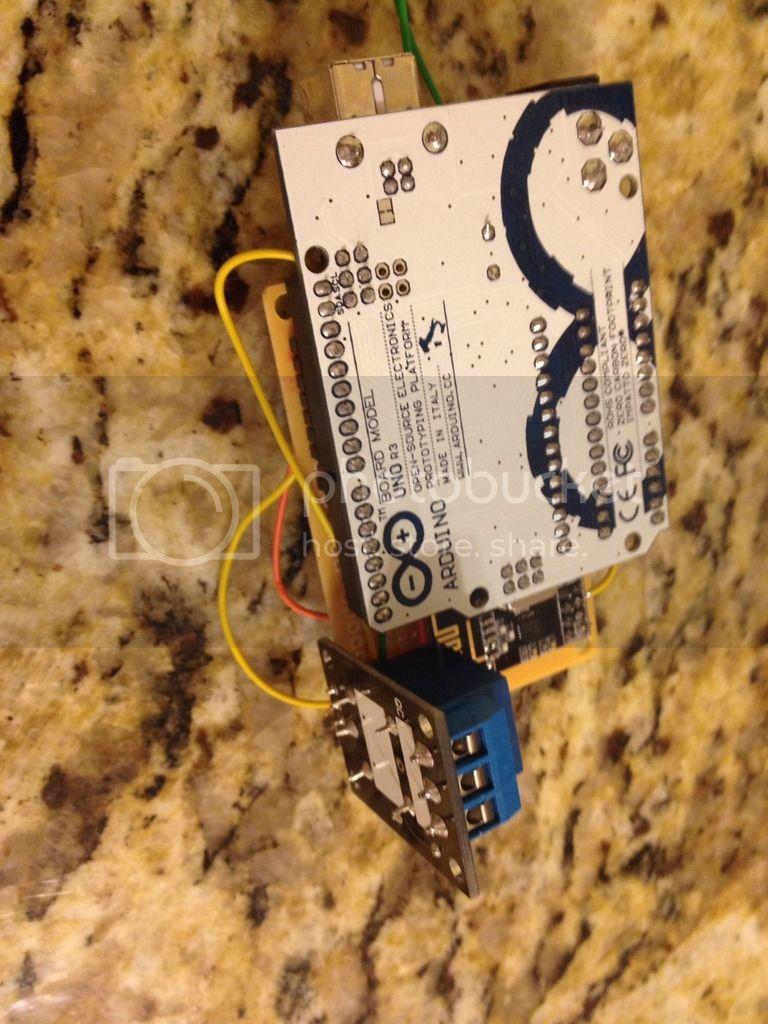
First the receiver. This is important because it shows you how to use an arduino to control 110.
parts:
1. Arduino UNO :Control logic and read the receiver http://www.amazon.com/Atmega328p-Atmega16u2-Version-Board-Arduino/dp/B00SF28U7A/ref=sr_1_5?s=pc&ie=UTF8&qid=1431745732&sr=1-5&keywords=arduino+Uno
2. Radio Transceiver: receives radio signal http://www.amazon.com/nRF24L01-Wireless-Transceiver-Arduino-Compatible/dp/B00E594ZX0/ref=pd_sim_147_1?ie=UTF8&refRID=0H4YXH7Y9HJJ301MSV7A
3. Relay board: turn the 5 volt logic signal to 110 v http://www.amazon.com/Docooler%C2%AE-Active-Channel-Module-Arduino/dp/B00G9TQH8U/ref=sr_1_7?s=electronics&ie=UTF8&qid=1431745874&sr=1-7&keywords=relay+board
4. perfboard wire it all up. Not necessary!
I'll get a little more detail into wiring late but look up how to wire the transceiver do a search for nrf24 and you will find videos wiring diagrams etc. Next when you right the code you will send a high signal to the relay board again I'll talk more on wiring later.
Here is what everything looks like wired up
Really you probably don't want a radio controlled plant waterer, light timer, water pump, temperature controller etc. The arduino is easy to code to read inputs and control outputs. The problem is the documentation on controlling 110 or wall outlet power with an arduino is not well documented. As we go on I'll write some simple code to show you how toread and control things without the radio.
That's it for now.
I thought I would share a project I did for my wife. I think it would translate well to hydro. The problem was we bought a new house and the bedrooms didn't have lights. They had a switch for an outlet. On the ceiling they had fans which were operated by a chain. The outlet connected to the switch was in a stupid spot. So I made a radio controlled extension cord. Now she can place the light where she wants and turn the light on and off with a remote. I'll talk hardware first and then talk about code.
First the receiver. This is important because it shows you how to use an arduino to control 110.
parts:
1. Arduino UNO :Control logic and read the receiver http://www.amazon.com/Atmega328p-Atmega16u2-Version-Board-Arduino/dp/B00SF28U7A/ref=sr_1_5?s=pc&ie=UTF8&qid=1431745732&sr=1-5&keywords=arduino+Uno
2. Radio Transceiver: receives radio signal http://www.amazon.com/nRF24L01-Wireless-Transceiver-Arduino-Compatible/dp/B00E594ZX0/ref=pd_sim_147_1?ie=UTF8&refRID=0H4YXH7Y9HJJ301MSV7A
3. Relay board: turn the 5 volt logic signal to 110 v http://www.amazon.com/Docooler%C2%AE-Active-Channel-Module-Arduino/dp/B00G9TQH8U/ref=sr_1_7?s=electronics&ie=UTF8&qid=1431745874&sr=1-7&keywords=relay+board
4. perfboard wire it all up. Not necessary!
I'll get a little more detail into wiring late but look up how to wire the transceiver do a search for nrf24 and you will find videos wiring diagrams etc. Next when you right the code you will send a high signal to the relay board again I'll talk more on wiring later.
Here is what everything looks like wired up

Really you probably don't want a radio controlled plant waterer, light timer, water pump, temperature controller etc. The arduino is easy to code to read inputs and control outputs. The problem is the documentation on controlling 110 or wall outlet power with an arduino is not well documented. As we go on I'll write some simple code to show you how toread and control things without the radio.
That's it for now.