Hey all! Hydromike here!
BACKGROUND INFORMATION
I am creating this thread so that it can be used as a good informational demonstartion of high pressure aeroponics (HPA) and also to create a place for me to drop pictures and updates of my system. I have been doing a little research over the past few weeks regarding this method of growing plants, called high pressure aeroponics. While the design itself can be tracked back many years, 1970's perhaps, the aeroponic system was revolutionized by NASA in the 1990's by reporting it as the most efficient way to grow plants in space. Studies have shown many benefits of growing plants with aeroponic techniques on both Earth and in space. To name a few benefits:
- Up to 98% less water usage compared conventional growing methods
- Nearly 1/3 the amount of nutrients used normally in hydroponic/soil applications
- Denser growing areas with closer plant spacing
- Remove the cost of soil
- Tomatoe crops can produce four harvests annually rather than two
Athough there are some great benefits to high pressure aeroponics, there are a few downfalls too:
- More pieces/parts to purchase compared to other growing methods
- Higher pump price
- Frequent maintenance (namely dealing with salt buildup on sprayheads)
- System dependent on electricity
Here's a brief definition of the concept:
Aeroponics is the process of growing plants in an air or mist environment without the use of soil or an aggregate medium (known as geoponics). The word "aeroponic" is derived from the Greek meanings of aero- (air) and ponos (labour). Aeroponic culture differs from both conventional hydroponics and in-vitro (plant tissue culture) growing. Unlike hydroponics, which uses water as a growing medium and essential minerals to sustain plant growth, aeroponics is conducted without a growing medium.[1] Because water is used in aeroponics to transmit nutrients, it is sometimes considered a type of hydroponics.
* Retrieved from Wikipedia.com
For those interested in a simple read-through of high-pressure aeroponics, take a look at this article:
http://home.howstuff.../aeroponics.htm
For those interested in the specifics of building this type of system, please continue to read!
There are actually two major types of aeroponics, one is the system type NASA produced, and the other type is more widely used and has been adapted to meet the needs of lower cost and ease of maintenance for the at home gardener. The latter type of system is termed as "low-pressure aeroponics." These types of systems rely on the use of a standard magdrive pump coupled with PVC or tubing, and sprinkler heads. Here is an example of this type of system:
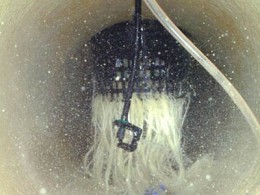
Figure 1: Low-Pressure aeroponic system
You can see that the water sprays from a sprinkler head as large drops that can be easily distinguished by the naked eye. These low-pressure aeroponic systems (LPAs) are generally ran on a 24/7 cycle to continually wet roots. These systems do work very well and are easier/cheaper to build than high pressure units. However, they're not as efficient as the high-pressure aeroponic systems. They differ in the pressure that the water/nutrients are shot through sprayheads, and the diameter of the water droplets. Whereas the LPAs produce easily visible droplets, high-pressure aeroponic systems (HPAs) produce, ideally, a 50 micron droplet size. HPAs also run on a much more precise time cycle; To properly run a HPAs, one must be able to control the timing so that the sprayers run 1-5 second/s, then are off for 3-5 minutes. Controlling the timing cycle and creating the proper size mist requires a specific set of components. We will look at those next.
So to recap:
Studies have shown that plants are more willing to absorb water in 50 micron droplets more efficiently than any other size. It is for this reason that HPAs are more efficient than the LPAs at growing plants. Again, to produce these optimal conditions, it requires a specific set of tools or components. The main components to understand in HPAs are as follows:
(1) High-Pressure Pumps,
(2) Pre-Pressurized Accumulator Tanks,
(3) Solenoids hooked to a relay timer, and
(4) Pressure switches
(1) HPAs require a PUMP that can produce enough water pressure to create the ideal droplet size of 50 microns. These are generally diaphragm pumps or reverse osmosis booster pumps. They need to produce about 100 psi. The type of pump I am using in my system is the Aquatec 8800 RO Booster pump. It can produce a maximum of 150 psi, so it gives me some wiggle room. I chose it because of its relatively cheap cost compared to other pumps and its whisper silent operation. The Aquatec 6800 RO Booster pump is also a good option as it can create 100 psi. It just depends on how large a system you want if you want to be able to upgrade the size of the system down the road. Other brands like Shurflo are good choices too.
(2) ACCUMULATOR TANKS are used in many homes that rely on well water. They help maintain the life of a well pump by working as a pressurized water storage device. They prevent the pump from needing to turn on every single time a faucet, or any other type of demand is placed on the system that requires input pressure. The accumulators have a rubber bladder that can be thought of as splitting the tank in half. One side can be pressurized with air, and the other side pumped full of water. Once the pump fills it with water, the accumulator will be able to let out pre-pressurized water, using the air pressure as a driving force to move the water when a faucet is turned on. I like to use a simple example.... the use of an accumulator is similar to a water gun... you pump up air, only to release the water at a higher "pressure" and supersoak your competition, although for HPAs you wouldn't want to drench your poor roots like that evil kid from up the road.
So you may be thinking, gee Hydromike, it seems like the pump is already creating pressure for the water... why spend the time/money on an accumulator? Well, let me tell you!
Besides john guest fittings ("quick connectors"), the pump is easily the most expensive part of HPAs so extending the pump life is going to cut down on long term costs. That is the first benefit of the accumulator tank - running the pump less. But even more importantly, the accumulator serves another purpose: creating an instant pressure once the solenoid opens so that the spray heads can operate for short intervals with the exact pressure they need to produce 50 micron droplets. If the pump directly provided the pressure instead of the accumulator, there would be a brief period of time where the pressure would be lower than 100 psi, and this lower pressure would create droplet sizes outside our 50 micron range.
Examples of good accumulator tanks are Well-x-trol tanks. They are specifically designed to do exactly what we want in HPAs. I will be using a 2-Gallon Well-x-trol tank, but you can use different sizes. Smaller to save space, or larger to make sure the pump has less on/off cycles. The only consideration to keep in mind for larger tanks is that the larger the tank, the more "stagnant" the solution may become because the same solution will sit in the tank for long periods of time.
***IMPORTANT: Always install a pressure release valve on accumulator tanks. If the pump or pressure-switch malfunctions and doesn't shut-off properly, the tank could become a bomb. The pressure release valve will prevent increases in pressure beyond a certain point. Very important safety feature!
(3) A SOLENOID is simply the item in HPAs that will close the water flow to the system when the timer turns off. It is an electronically operated shut-off valve. You plug in the solenoid into a relay timer. The timer will control when the solenoid opens and closes, and when the plants receive their nutrients. Timers for running the solenoid are best when accurate down to 1 second "on" times, and "off" times in the minutes range. The timer I use is the ART DNe Recycle Timer, but there are many other brands that can be used. I have even seen links around these forums for DIY relay timers which could help cut down on costs.
(4) The PRESSURE SWITCH. This is a component that is either purchased separately, or is built into the pump. The Aquatec 8800 doesn't have a pressure switch so I purchased it separately. What it does is control at what pressure the pump turns on and when it turns off. Its that simple. If you want your accumulator to be maximally pressured at 100 psi, but to be no lower than say 80 psi, then you set the pressure switch to activate the pump at 80 psi and turn off at 100 psi. Again, pretty simple. The Aquatec company manufactures pressure switches made specifically for its RO pumps, and they can come pre-set to 80 psi cut-off, which is what I will use.
Now, this type of system can seem overwhelming at first. I cannot tell you how many hours it took me to find enough sources to verify the items needed to make a HPAs, but it took a good deal of time over the past few weeks. Keep in mind that once you understand the above components though, the rest is just connecting tubing to the parts.
Here are some pictures of HPAs:
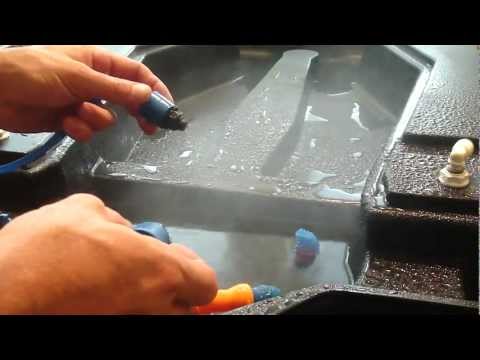
Figure 2: Highly pressurized solution emmitted from spray nozzles

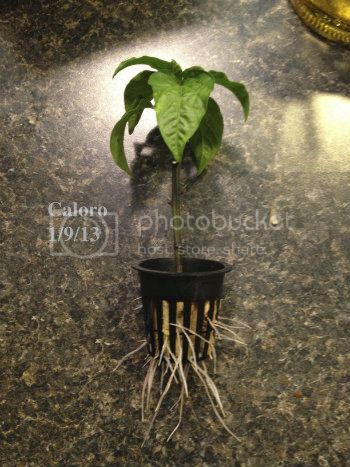
Figure 3: Root system inside HPAs

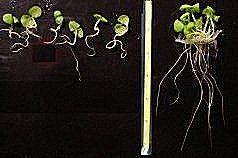
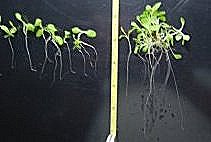
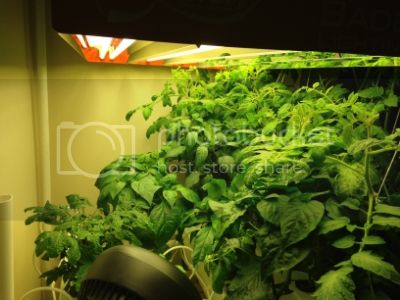
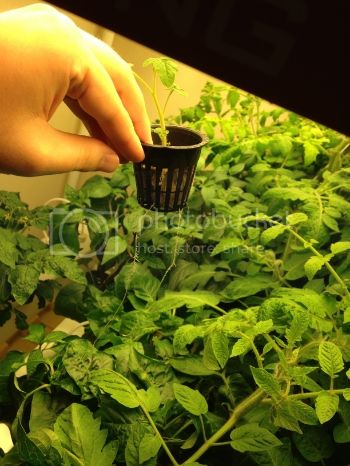
Figure 4: Demonstration of how closely plants can be placed in HPAs
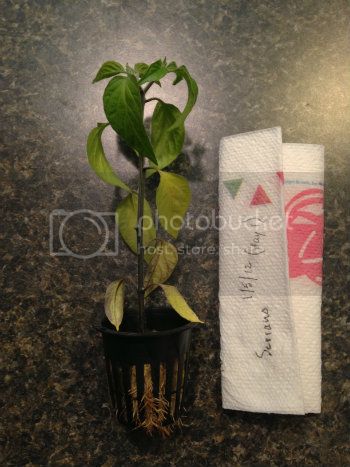
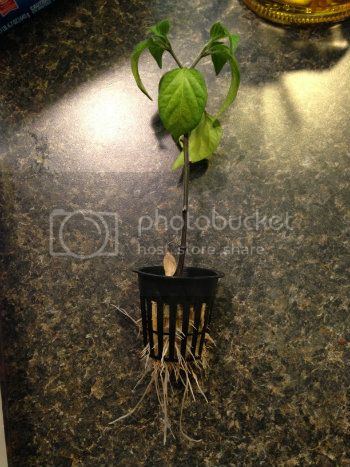
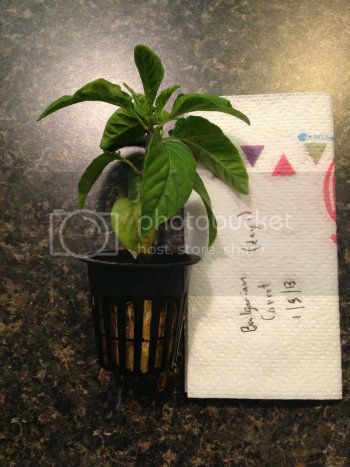
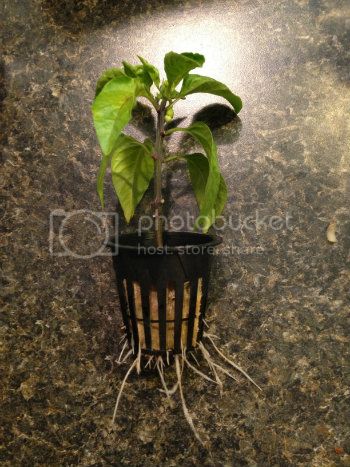
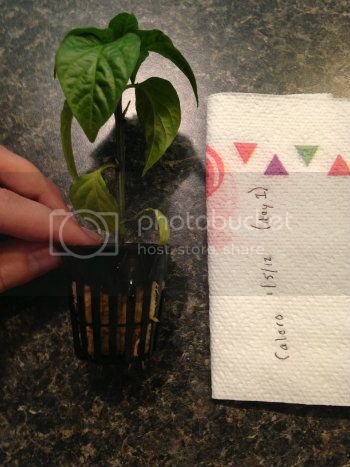
Another key feature of HPAs is with the root system. You will notice that if the system is working properly and your solenoid timing is good, the roots will look fuzzy like so:
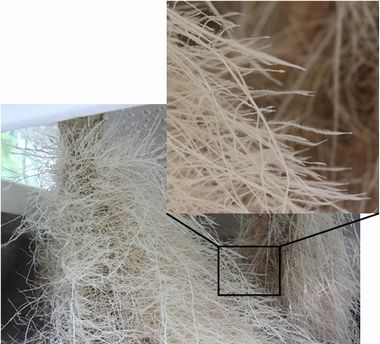
Figure 5: Fuzzy root system with maximized surface-area
Figure 5 shows what you want your aeroponic root system to look like. The root hairs help maximize root surface area. If the roots are looking wet and you cannot see root hairs, the system is probably wetting the roots too often and should be adjusted for shorter on times or the sprayheads should be placed in different locations.
So hopefully now you have a better understanding of the difference between HPAs and LPAs, as well as the components required to make a highly pressurized system. Feel free to post comments and questions.
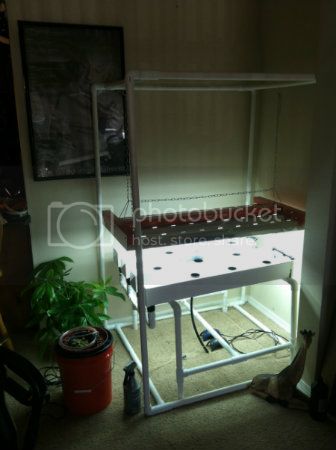
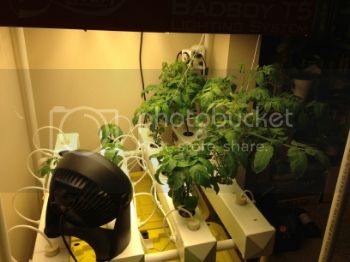
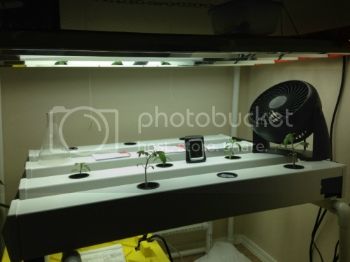
My Aeroponics Setup

1 = Accumulator
2 = 100 psi Pressure Relief Valve
3 = 12V DC Solenoid
4 = Pressure Gauge
5 = Pressure Switch
6 = Aquatec 8800 RO Booster Pump
7 = 200 Mesh Filter
BACKGROUND INFORMATION
I am creating this thread so that it can be used as a good informational demonstartion of high pressure aeroponics (HPA) and also to create a place for me to drop pictures and updates of my system. I have been doing a little research over the past few weeks regarding this method of growing plants, called high pressure aeroponics. While the design itself can be tracked back many years, 1970's perhaps, the aeroponic system was revolutionized by NASA in the 1990's by reporting it as the most efficient way to grow plants in space. Studies have shown many benefits of growing plants with aeroponic techniques on both Earth and in space. To name a few benefits:
- Up to 98% less water usage compared conventional growing methods
- Nearly 1/3 the amount of nutrients used normally in hydroponic/soil applications
- Denser growing areas with closer plant spacing
- Remove the cost of soil
- Tomatoe crops can produce four harvests annually rather than two
Athough there are some great benefits to high pressure aeroponics, there are a few downfalls too:
- More pieces/parts to purchase compared to other growing methods
- Higher pump price
- Frequent maintenance (namely dealing with salt buildup on sprayheads)
- System dependent on electricity
Here's a brief definition of the concept:
Aeroponics is the process of growing plants in an air or mist environment without the use of soil or an aggregate medium (known as geoponics). The word "aeroponic" is derived from the Greek meanings of aero- (air) and ponos (labour). Aeroponic culture differs from both conventional hydroponics and in-vitro (plant tissue culture) growing. Unlike hydroponics, which uses water as a growing medium and essential minerals to sustain plant growth, aeroponics is conducted without a growing medium.[1] Because water is used in aeroponics to transmit nutrients, it is sometimes considered a type of hydroponics.
* Retrieved from Wikipedia.com
For those interested in a simple read-through of high-pressure aeroponics, take a look at this article:
http://home.howstuff.../aeroponics.htm
For those interested in the specifics of building this type of system, please continue to read!
There are actually two major types of aeroponics, one is the system type NASA produced, and the other type is more widely used and has been adapted to meet the needs of lower cost and ease of maintenance for the at home gardener. The latter type of system is termed as "low-pressure aeroponics." These types of systems rely on the use of a standard magdrive pump coupled with PVC or tubing, and sprinkler heads. Here is an example of this type of system:
Figure 1: Low-Pressure aeroponic system
You can see that the water sprays from a sprinkler head as large drops that can be easily distinguished by the naked eye. These low-pressure aeroponic systems (LPAs) are generally ran on a 24/7 cycle to continually wet roots. These systems do work very well and are easier/cheaper to build than high pressure units. However, they're not as efficient as the high-pressure aeroponic systems. They differ in the pressure that the water/nutrients are shot through sprayheads, and the diameter of the water droplets. Whereas the LPAs produce easily visible droplets, high-pressure aeroponic systems (HPAs) produce, ideally, a 50 micron droplet size. HPAs also run on a much more precise time cycle; To properly run a HPAs, one must be able to control the timing so that the sprayers run 1-5 second/s, then are off for 3-5 minutes. Controlling the timing cycle and creating the proper size mist requires a specific set of components. We will look at those next.
So to recap:
- As the name suggests, HPAs require high pressures to operate and thus need special components
- HPAs require an optimal 50 micron droplet size from the sprayhead
- On-Off times vary, but the sweet spot is about 1-5 second/s on, 3-5 minutes off
Studies have shown that plants are more willing to absorb water in 50 micron droplets more efficiently than any other size. It is for this reason that HPAs are more efficient than the LPAs at growing plants. Again, to produce these optimal conditions, it requires a specific set of tools or components. The main components to understand in HPAs are as follows:
(1) High-Pressure Pumps,
(2) Pre-Pressurized Accumulator Tanks,
(3) Solenoids hooked to a relay timer, and
(4) Pressure switches
(1) HPAs require a PUMP that can produce enough water pressure to create the ideal droplet size of 50 microns. These are generally diaphragm pumps or reverse osmosis booster pumps. They need to produce about 100 psi. The type of pump I am using in my system is the Aquatec 8800 RO Booster pump. It can produce a maximum of 150 psi, so it gives me some wiggle room. I chose it because of its relatively cheap cost compared to other pumps and its whisper silent operation. The Aquatec 6800 RO Booster pump is also a good option as it can create 100 psi. It just depends on how large a system you want if you want to be able to upgrade the size of the system down the road. Other brands like Shurflo are good choices too.
(2) ACCUMULATOR TANKS are used in many homes that rely on well water. They help maintain the life of a well pump by working as a pressurized water storage device. They prevent the pump from needing to turn on every single time a faucet, or any other type of demand is placed on the system that requires input pressure. The accumulators have a rubber bladder that can be thought of as splitting the tank in half. One side can be pressurized with air, and the other side pumped full of water. Once the pump fills it with water, the accumulator will be able to let out pre-pressurized water, using the air pressure as a driving force to move the water when a faucet is turned on. I like to use a simple example.... the use of an accumulator is similar to a water gun... you pump up air, only to release the water at a higher "pressure" and supersoak your competition, although for HPAs you wouldn't want to drench your poor roots like that evil kid from up the road.
So you may be thinking, gee Hydromike, it seems like the pump is already creating pressure for the water... why spend the time/money on an accumulator? Well, let me tell you!
Besides john guest fittings ("quick connectors"), the pump is easily the most expensive part of HPAs so extending the pump life is going to cut down on long term costs. That is the first benefit of the accumulator tank - running the pump less. But even more importantly, the accumulator serves another purpose: creating an instant pressure once the solenoid opens so that the spray heads can operate for short intervals with the exact pressure they need to produce 50 micron droplets. If the pump directly provided the pressure instead of the accumulator, there would be a brief period of time where the pressure would be lower than 100 psi, and this lower pressure would create droplet sizes outside our 50 micron range.
Examples of good accumulator tanks are Well-x-trol tanks. They are specifically designed to do exactly what we want in HPAs. I will be using a 2-Gallon Well-x-trol tank, but you can use different sizes. Smaller to save space, or larger to make sure the pump has less on/off cycles. The only consideration to keep in mind for larger tanks is that the larger the tank, the more "stagnant" the solution may become because the same solution will sit in the tank for long periods of time.
***IMPORTANT: Always install a pressure release valve on accumulator tanks. If the pump or pressure-switch malfunctions and doesn't shut-off properly, the tank could become a bomb. The pressure release valve will prevent increases in pressure beyond a certain point. Very important safety feature!
(3) A SOLENOID is simply the item in HPAs that will close the water flow to the system when the timer turns off. It is an electronically operated shut-off valve. You plug in the solenoid into a relay timer. The timer will control when the solenoid opens and closes, and when the plants receive their nutrients. Timers for running the solenoid are best when accurate down to 1 second "on" times, and "off" times in the minutes range. The timer I use is the ART DNe Recycle Timer, but there are many other brands that can be used. I have even seen links around these forums for DIY relay timers which could help cut down on costs.
(4) The PRESSURE SWITCH. This is a component that is either purchased separately, or is built into the pump. The Aquatec 8800 doesn't have a pressure switch so I purchased it separately. What it does is control at what pressure the pump turns on and when it turns off. Its that simple. If you want your accumulator to be maximally pressured at 100 psi, but to be no lower than say 80 psi, then you set the pressure switch to activate the pump at 80 psi and turn off at 100 psi. Again, pretty simple. The Aquatec company manufactures pressure switches made specifically for its RO pumps, and they can come pre-set to 80 psi cut-off, which is what I will use.
Now, this type of system can seem overwhelming at first. I cannot tell you how many hours it took me to find enough sources to verify the items needed to make a HPAs, but it took a good deal of time over the past few weeks. Keep in mind that once you understand the above components though, the rest is just connecting tubing to the parts.
Here are some pictures of HPAs:
Figure 2: Highly pressurized solution emmitted from spray nozzles
Figure 3: Root system inside HPAs
Figure 4: Demonstration of how closely plants can be placed in HPAs
Another key feature of HPAs is with the root system. You will notice that if the system is working properly and your solenoid timing is good, the roots will look fuzzy like so:
Figure 5: Fuzzy root system with maximized surface-area
Figure 5 shows what you want your aeroponic root system to look like. The root hairs help maximize root surface area. If the roots are looking wet and you cannot see root hairs, the system is probably wetting the roots too often and should be adjusted for shorter on times or the sprayheads should be placed in different locations.
So hopefully now you have a better understanding of the difference between HPAs and LPAs, as well as the components required to make a highly pressurized system. Feel free to post comments and questions.
My Aeroponics Setup
1 = Accumulator
2 = 100 psi Pressure Relief Valve
3 = 12V DC Solenoid
4 = Pressure Gauge
5 = Pressure Switch
6 = Aquatec 8800 RO Booster Pump
7 = 200 Mesh Filter