• Blog your pepper progress. The first image in your first post will be used to represent your Glog.

Stickman's 2018 Soil Mineralization Glog

Hi all! Now that the new year is here, it's time to swing into gear and get ready for the next season of growing chiles! I'll be starting my seeds in a few weeks, and after rotating the crops in my raised beds to get rid of the Pepper Maggots that showed up in 2016, I'll be able to plant a lot more this year. In the meantime, I thought I'd share what I do to prepare my garden soil for the start of the season. I've grown chiles in pots and in-ground, and for me at least, I seem to do better with the plants grown in the soil.
 
To start with, my garden soil is sandy, so I have to add lots of compost in the top six inches of soil to hold moisture and prevent nutrients from leaching away. Soil microbes break it down in just a few years though, so keeping it topped up is a yearly necessity. We compost our kitchen waste to that end, but there's never enough, so we also buy it from a local outfit that produces it commercially. I was put onto adding biochar as well by brother Scott (Devv.)  The biochar does the same things that humus does but it lasts longer and  helps the environment by sequestering carbon in the soil. I've also been reading about how amending with Montmorillonite clay can increase fertility and help with soil structure, but more on that in a future post.
 
At the end of each growing season I take soil samples from my various gardens and get them tested at Logan Labs in Ohio. They do a more thorough job than our UMass extension by testing for Cobalt, Molybdenum and Silicate levels as well as he usual suspects. :)    I'm taking a "Build and Maintain" approach toward soil nutrients because I want my plants to have the best organic nutrition available to them, and at the small scale I'm planting, it's affordable for me. http://nevegetable.org/cultural-practices/plant-nutrients  
 
Here's my last soil test, taken the end of November. It's the starting point for figuring what amendments I'll need when I prep my beds for planting in the spring. The pepper garden is bordered in yellow.
fall2017soiltest.png

 
In my next post I'll cover the math I use to figure that out. Cheers!
 
PaulG said:
Interesting as always, Rick!  Can't wait to see how
your results turn out over the next few seasons. Grow-
ing in containers has made me complacent   :oops:
 
Oh well. Good on ya, mate. That garden plot is money!
 
:cheers:  to a great season for you, my friend!
 
I dunno about that Paul. Keeping plants in containers happy keeps you on your toes... the plants exhaust their nutes and water more quickly than they do in the soil. The flip side is that being above ground, the plants are warmer, so there's pluses and minuses to both methods. Thanks for the good vibe! :)
 
 
randyp said:
Rick it's been awhile.Daughter is opening a business in our small town,my factory job is still taking pieces out of me and age is an obstacle that we face every day.I won't be doing a grow log this year,as my 2017 log was an embarrassment because I did not put the time in to keep it up.I still can't go without reaching and keeping up with the guys I have the upmost respect for,Scott"dew" terry,Paul and a few others.Rick you are one of the smartest guys I have had the privilege of getting to know.I love following your grows because there is always a great chance I will learn something.Hope u don't mind me posting a couple pics.I made this DIY Aerogarden to give it a shot for some seeds this year.My test seeds came up so I feel good about putting the main grow seeds in and feel confident I won't kill them before they have a chance.I did this after watching u last year and your recommendation to build one.Anyway buddy thanks for all u do.

Aero in action
attachicon.gif
IMG_20180114_212135740_HDR.jpg

Top view with mg kit bought to hijack the net pot
attachicon.gif
IMG_20180106_092905530.jpg

Test cubes 'mg peat pods' and 'rockwool'
attachicon.gif
IMG_20180114_090503731.jpg

Inside the simple "deep water"setup
attachicon.gif
IMG_20180106_094217743.jpg
 Good to see you Randy!
 
Congrats on your daughters endeavors! That and take care of yourself! I'm on the countdown. Less than 2 years before I don't care what day of the week it is.
 
So sorry for the hijack Rick!
 
stickman said:
 
Sure thing Scott! I have a deal with the homesteaders I work with to buy a portion of what they have on hand at cost. Their source for many organic nutes is this place... https://flipbook.brandbits.com/b8e6e27e5e/index.html
  The organic products section starts on page 116. Still trying to locate the Cobalt Sulfate... we haven't heard back from everyone yet. If you find a place where we can get Ag-grade Cobalt Sulfate Heptahydrate or chelated Cobalt solution let us know please?
 
I sure will, and I'll be looking ;)
 
 
Devv said:
 Good to see you Randy!
 
Congrats on your daughters endeavors! That and take care of yourself! I'm on the countdown. Less than 2 years before I don't care what day of the week it is.
 
So sorry for the hijack Rick!
 
De nada compadre... :)
 
Devv said:
 
I sure will, and I'll be looking ;)
 
 
Thanks Scott. I found a couple sources, though the first is a Cobalt Chloride feed supplement that doesn't list a price. I assume I'd have to contact them to get one.
[SIZE=11pt]https://biofeed.com/wp-content/uploads/tech_sheets/Biofeed_TechSheet_Cobalt-Plus.pdf[/SIZE]
[SIZE=11pt]http://www.castlevalleyfarms.com/store/fertilizers[/SIZE]
 
[SIZE=11pt]An interesting point about cobalt is that it's necessary in the formation of vitamin B12, and is up to 4% of its composition. Plants and most animals (like humans) can't synthesize it in their bodies, they need soil-dwelling microbes to do it for them. Wow... another argument for supporting a diverse soil biota and no-till farming methods.[/SIZE]
 
https://en.wikipedia.org/wiki/Vitamin_B12
 
This makes me wonder about selenium too. I'll have to look into it later.
 
Trident chilli said:
I should do beds but like PaulG I also get complacent growing in containers... as usually Rick I will be following your glog closely... all the very best for this forthcoming season
 
Cheers John, thanks for stopping by and the good vibe. :)
 
stickman said:
Thanks for your input Randy, it's all grist for the mill. [emoji106] Sorry to hear you're slowing down, but the glass is still half full since you're not ready for a dirt nap yet, eh?[emoji6] Will you be helping your daughter with her new business?

What dimensions did you use for the plastic tub in your hydro seed starter? Did you use a standard aquarium air pump and air stone inside? I have a 4 ft light fixture with four 6500k t5 flourescent tubes to set up overhead, so lights we have. I'm thinking of getting ply-scor and 2x2s to build a more permanent growbox, insulating it with sheet foam and installing a thermostically-controlled ceramic/electric heater inside on a seperate timer than the lights. The idea is to have the lights inside the growbox so waste heat from them will warm the inside of the box. When the timer shuts off the lights, another one for the heater will kick on. That's the plan anyway. I can't afford a grow tent.
Cheers!

Sent from my LGL44VL using Tapatalk
Daughter bought an old cafe in town opening a boutique in one end and photography studio in the back.She has me helping with renovations(free labor)
I bought a couple 1-2 gallon totes and an herb kit from mg to get the plastic net pods.That came with there nutes I used on test.But I now have the general hydroponics stuff for future nutes.I based mine off the bubbler setup and not the mist or where it drips in each pod setup.My first batch of superhots is taking a while to pop.im not real happy with the peat pods mg uses.its more of a sponge if u ask me.Are your water temps controlled.Im trying to see where I messed up.Maybe the 1/2 cap of calmag might have something to do with it since i tend to over think things.lol
 
randyp said:
Daughter bought an old cafe in town opening a boutique in one end and photography studio in the back.She has me helping with renovations(free labor)
I bought a couple 1-2 gallon totes and an herb kit from mg to get the plastic net pods.That came with there nutes I used on test.But I now have the general hydroponics stuff for future nutes.I based mine off the bubbler setup and not the mist or where it drips in each pod setup.My first batch of superhots is taking a while to pop.im not real happy with the peat pods mg uses.its more of a sponge if u ask me.Are your water temps controlled.Im trying to see where I messed up.Maybe the 1/2 cap of calmag might have something to do with it since i tend to over think things.lol
 
Good luck with your daughter's new biz, I'll bet she's glad for the help.
 
I hear ya 'bout some of the superhot seeds taking a while to germinate. That happened with me last year too. Some of it is probably that the seed is kinda old and not as vigorous. That's why I'm gonna try soaking the seeds beforehand and using the wet paper towel method. I have the electric heating mats sized for 1020 trays, and I'll be placing the ziplok bags with the paper towels inside on those to provide the heat and trying a couple different methods when pre-soaking. One soaking solution will be coconut water because it contains vitamins and gibberellins that are supposed to help the seeds in breaking dormancy. The other one will be water with enough vinegar in it to lower the pH to 5.2 to try to mimic the conditions in a bird's gut and soften the seed coat. We'll see which works better.
 
http://www.aviannutritionresource.co.uk/avian-digestive-systems.php
 
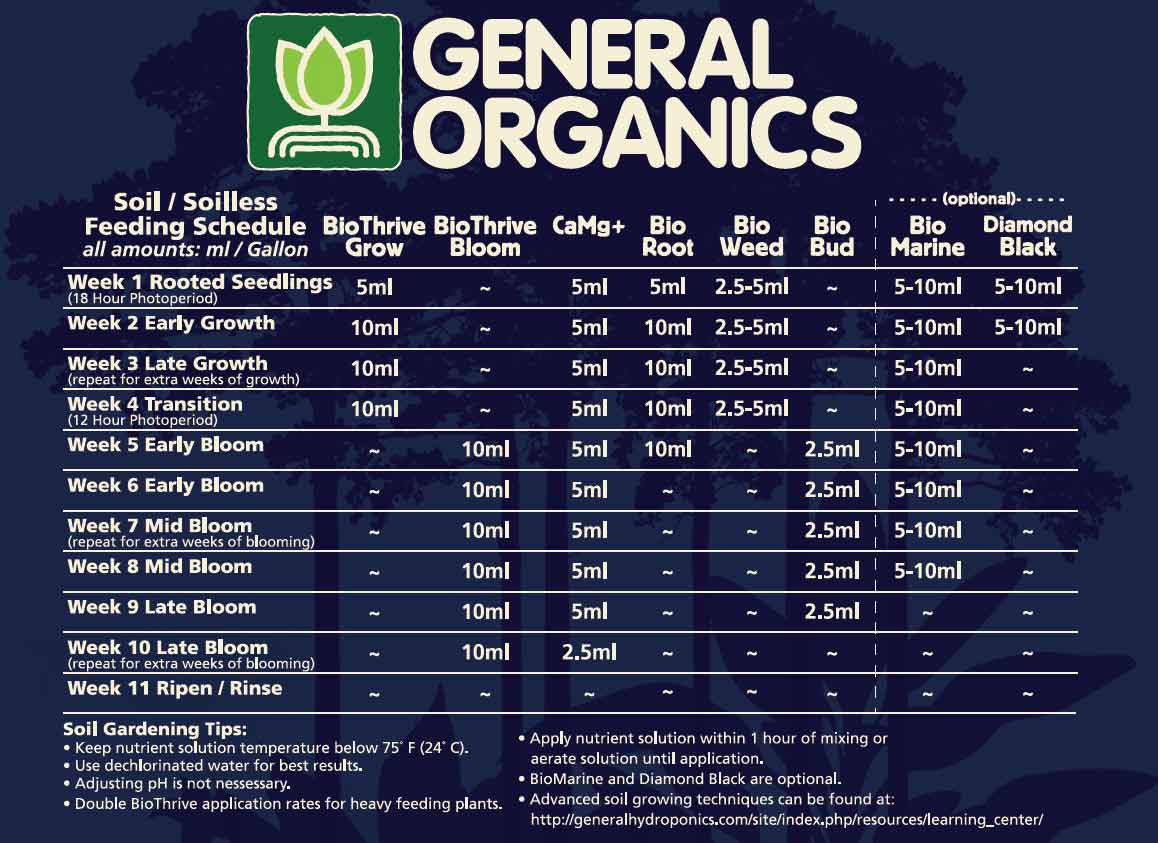
The Aerogarden isn't heated, but I keep it at room temperature upstairs in the heated part of the house. I didn't have any problems with the sponges from MG. They're made from peat and biodegradeable. If you're worried about adding too much cal mag, maybe you should check your pH... We don't have a lot of chlorine in our tap water so the pH is neutral or nearly so. After the radicles have popped, I transfer the seeds to the Aerogarden and use the nutes supplied with it until they grow  out to the third node, then I transplant to 16 oz Solo cups with a 50-50 mix of washed coco coir and peat moss based pro-mix, move them downstairs to the grow box in the cellar and switch to the General Organics nutes at the recommended amounts as a soil drench, watering from the bottom.
 
GO-Feedchart1.jpg

 
Hope this helps!
 
 
stickman said:
 
Good luck with your daughter's new biz, I'll bet she's glad for the help.
 
I hear ya 'bout some of the superhot seeds taking a while to germinate. That happened with me last year too. Some of it is probably that the seed is kinda old and not as vigorous. That's why I'm gonna try soaking the seeds beforehand and using the wet paper towel method. I have the electric heating mats sized for 1020 trays, and I'll be placing the ziplok bags with the paper towels inside on those to provide the heat and trying a couple different methods when pre-soaking. One soaking solution will be coconut water because it contains vitamins and gibberellins that are supposed to help the seeds in breaking dormancy. The other one will be water with enough vinegar in it to lower the pH to 5.2 to try to mimic the conditions in a bird's gut and soften the seed coat. We'll see which works better.
 
http://www.aviannutritionresource.co.uk/avian-digestive-systems.php
 
The Aerogarden isn't heated, but I keep it at room temperature upstairs in the heated part of the house. I didn't have any problems with the sponges from MG. They're made from peat and biodegradeable. If you're worried about adding too much cal mag, maybe you should check your pH... We don't have a lot of chlorine in our tap water so the pH is neutral or nearly so. After the radicles have popped, I transfer the seeds to the Aerogarden and use the nutes supplied with it until they grow  out to the third node, then I transplant to 16 oz Solo cups with a 50-50 mix of washed coco coir and peat moss based pro-mix, move them downstairs to the grow box in the cellar and switch to the General Organics nutes at the recommended amounts as a soil drench, watering from the bottom.
 
GO-Feedchart1.jpg

 
Hope this helps!
 
can these nutes be used in hydroponics?
 
chocolatescotchbonnet said:
thanks Rick.. I just noticed can be for soil/soiless .
 
Cheers Joe. :)
 
I have half a quart of the GH Black Diamond humates left over from last year. I'll use it up first, but I think I'll replace it with Safergro Fulmag. Humates... especially Fulvic acid are incredibly useful both hydroponically and in soil because they increase absorbtion by grabbing onto nutes in the soil solution or hydro solution and helping carry them through the cell membranes in the roots of plants.
 
https://lib.dr.iastate.edu/cgi/viewcontent.cgi?referer=https://www.google.com/&httpsredir=1&article=1193&context=extension_ag_pubs
 
I don't have local prices yet, but I've heard that the Fulmag is more concentrated Fulvic acid at a cheaper price than the GH products. I'll have to find out for sure. It would be partiularly useful to me right now since I need to add Magnesium to a couple of my raised beds to re-mineralize them, and I was going to use wood ashes, but the ashes are five times higher in Calcium than Magnesium and would upset the balance I'm trying to achieve.
 
https://www.icmag.com/ic/showthread.php?t=3843
http://www.safergro.com/products/fulmag/
 
That's good info Rick.I set seeds in pods no soak figured they would be getting plenty of moisture.My plan is to just experment another germination idea,soon as the are popped and big enough to grab they go to dirt cups the grow table and fish emulsion.Also I'm cutting 2 inches off grow table lining it and dropping 45 emitters to save my back from the tub filled water system I have done in past.Parts get here Friday I can't wait
 
randyp said:
That's good info Rick.I set seeds in pods no soak figured they would be getting plenty of moisture.My plan is to just experment another germination idea,soon as the are popped and big enough to grab they go to dirt cups the grow table and fish emulsion.Also I'm cutting 2 inches off grow table lining it and dropping 45 emitters to save my back from the tub filled water system I have done in past.Parts get here Friday I can't wait
 
Here's a bunch of info on Humates that you might want to check out. The more I read about them, the more I think I'll be adding Fulvic acid to my vinegar seed soak and the hydro solution in the Aerogarden, and Ful Humix to my raised beds and composters.
 
http://www.blackearth.com/research?hsCtaTracking=626b2f91-8aea-448b-b36d-f8bf19fb1db2%7C24c6172a-826d-4e44-9539-7b61571f1a43
 
http://www.bioag.com/images/BioAg_Ful-Power_FAQ_LR.pdf
 
http://www.bioag.com/images/Ful-Humix_FAQ_Garden_Fulvic_1-22-14_LR.pdf
 
Your modified hydro project sounds interesting Randy, I'd be interested in seeing pics of your hydro setup while being assembled and finished if you want to share. Cheers!
 
 
I will dig pics up Rick.Had my first pod pop.Its either a Carolina Reaper(seeds from Ed Currie) or a 7pot Primo(seeds from Troy Primeaux).I have given those plants a number and am doing a year long side by side case study on traits and simulairities.Should be interesting
 
Here is some of what I have Rick

You have most of the 2 gallon setup with mg pucks and fert being used.This is the start of that project
IMG_20180102_154044539.jpg


Project 2 is 1 gal tote using netting I grabbed from work to hold rockwool cubes.1 mm of the three step general hydroponics ferts for feed.I zip tied bottoms and use toothpicks at top for placement.
IMG_20180121_195152062.jpg
IMG_20180121_195145451.jpg

First pod of year this morning in the 2 gal setup
IMG_20180124_050553786.jpg
 

Attachments

  • IMG_20180121_195618994.jpg
    IMG_20180121_195618994.jpg
    43.5 KB · Views: 94
randyp said:
I will dig pics up Rick.Had my first pod pop.Its either a Carolina Reaper(seeds from Ed Currie) or a 7pot Primo(seeds from Troy Primeaux).I have given those plants a number and am doing a year long side by side case study on traits and simulairities.Should be interesting
 

Very cool setup Randy! What size air pump and air stone did you use for the bubbler design you made? If the styrofoam sheet modification to the original Aerogarden doesn't work out I think I'll go that way. To make the holes for the sponge holders I think I'll use a piece of copper pipe of the right diameter and heat it up with a torch to melt the holes in the lid instead of cutting them.
 
Back
Top