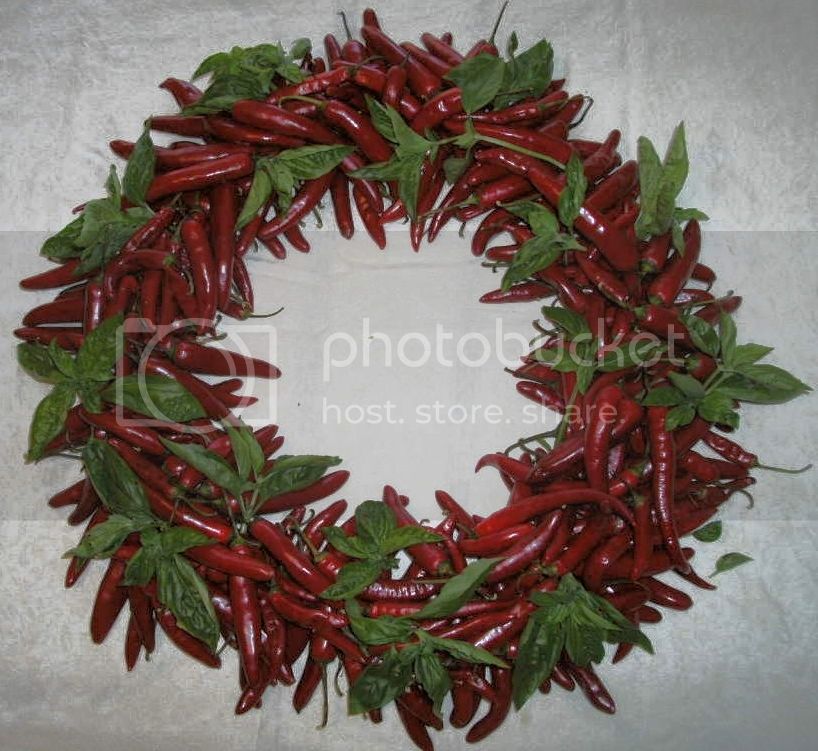
• Blog your pepper progress. The first image in your first post will be used to represent your Glog.

PaulG 2012

I'm chomping at the bit to get started with some new chilli varieties this coming Spring. So far I've just scratched the surface with Poblanos, Jalapenos and Serranos, all of which I really like. I've been egged on by a new Second Generation Mejicano neighbor as we've talked about hot chillis over the back fence! He helped me make some Pico de Gallo with my Serranos and Early Girl tomatoes and has some great recipes from his mother and grandmother. Hopefully I'll be able to share some of them on this forum in the future. I need to grow more Cilantro. Oh yeah!

I've ordered seed from several sources which received at least a few good comments on this forum (6/12 - items crossed out did not germ, or weren't planted this year):

US Hot Stuff:
Bolivian Rainbow
Yellow Peter
Nosegay
Trinidad Scorpion (from Spankycolts)
Devil Tongue

The Hippy Seed Company: Seed Packet Mixes
NuMex Twilight (from Siliman)
Yellow Jellybeans
Tom Thumbs
Wild Texas Tepin

Refining Fire: Seed Packet Mix
Scotch Bonnet
Chocolate Habanero
Jamaican Red Mushroom

New Mexico State University:
Chiltepin
Omnicolor
Red Carribean Habanero
Orange Habanero

Pepper Gal:
Aji Yellow (request from a Peruvian friend of ours!)
Thai Hot

Peppermania:
Inca Lost
Fatali
White Habanero (from Spanky)
Red Savina (cross with Fatali, from Spanky)
Bishop's Crown
Inca Red Drop
Orange Rocoto
Congo Trinidad

I doubt I will be able to try all of these out this year, but I have saved my seeds in small glass jars with tight-fitting lids for storage over the next year. I have been saving seed from other garden produce and have had good luck with germinating them after two or even three years. The jars are stored in boxes in the garage for a cool dark location for them. I have ordered several compact varieties with an eye toward trying to winter over some of my plants this year. Since I didn't even know peppers were perennial, I can say I've already learned something from this forum!


I purchased a small greenhouse from One Stop Gardens (via Harbor Freight) for $300 four years ago. This is one of the greenhouse kits I've noticed in the greenhouse advertsing bar at the bottom of some of the pages on this forum. This picture is from Spring/ Summer 2011. You can see my tomato and pepper starts on the sheves. I winter over some bonsai trees and jade plants as well as geraniums, begonias and Gerbera Daisies. In the winter, I use a small space heater (visible on ground in the picture) to keep the temp at 40F during the few cold weeks we experience here. So far it has worked pretty well. If overwintering pepper plants becomes a reality I'll be making more room in the greenhouse! I've started a thread in the Grow Tech forum to discuss issues which crop up with these units.
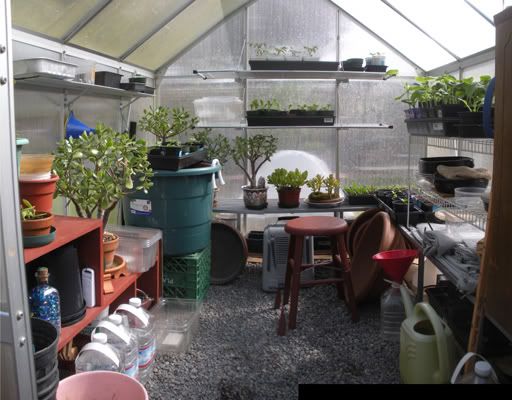
greenhousepan11a.jpg


January 14, 2012:

Composting:

Okay, I need to do something outside. I know, I'll dig out a compost bin. We've had a little dry cool weather, so the worms have burrowed down, and the compost is crumbly, if a tad wet.
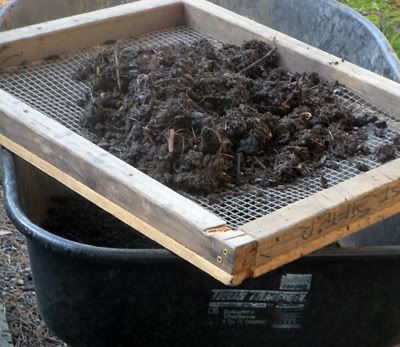
DSCN3318sm.jpg


The first step - dig out the bin and sift the material. I use a homemade frame with a layer of 1/4 inch plastic hardware cloth backed with a layer of one inch mesh poultry netting. The fine stuff goes into the wheelbarrow, the coarse stuff into an adjacent compost bin we're still building up.
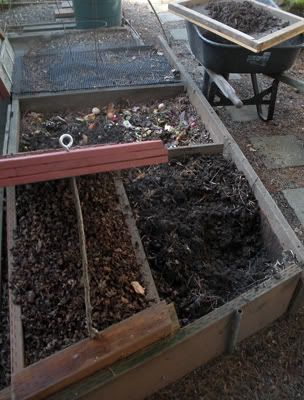
DSCN3316sm.jpg


The bin on the left is covered to keep the leafy material dry and fluffy. The dry leaves are an important layer in the compost 'cake'. The bin on the right is the one I'm digging out. Nice, dark and crumbly with lots of worms! The sifter is on the wheelbarrow, and some of the coarse stuff is already on the active compost bin in the middle. The bin in the back is resting for several of months. It has a black plastic hardware cloth cover to keep out squirrels and racoons.
DSCN3321sm.jpg


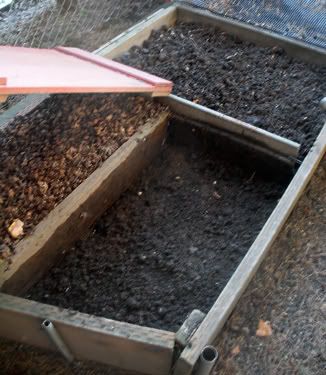
The bin is all dug out. I left about two inches of broken up compost on the bottom of the hole to create a space for the worms to move into. You can see the bin in the middle has a layer of coarse stuff spread out on the top.
DSCN3323sm.jpg


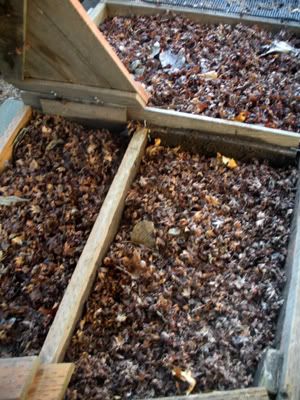
The last step is to put a nice deep layer of dry leaves on the bin we just dug out. Now that bin will rest for a at least several months or more while the earthworms move into the compost/earth interface and do their work. That will make a great base for the next cycle of composting in this bin. I put a thin layer of leaves on the middle bin, too. Now there's a nice layer cake of dirt/compost, leaves. kitchen scraps. All small yard clippings except grass go into the compost bins, even tomato vines and pepper branches and twigs. I don't even chop stuff up too much. I try to have at least 10 or 12 layers of stuff built up before I cover the bin with a layer of dirt/compost and let the worms work for several months. I'm getting about 12-18 cubic feet of compost from these bins a year. My goal is to become 'soil self-sufficient' at some point, perhaps only having to procure horticultural pumice or vermiculite and some peat moss every so often.
DSCN3322sm.jpg


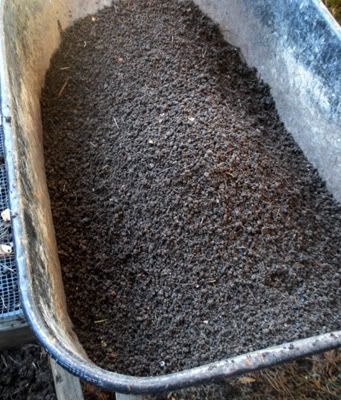
The good stuff. It will go into a plastic, vented storage bin for at lest eight weeks to cure a bit. Then I mix it with a little peat moss and some vermiculite or pumice for aeration. In my large containers, I add 2 or 3 inches of compost worked into the top of the container only every year. I try not to mix up the soil layers in the big containers very much, letting the nutrients percolate down through the soil as in a natural setting. As the blog continues this summer, I'll include photos of the irrigation system and containers I use to grow my tomatoes and peppers, and a few other things.
 
Paul I just got caught up. Are those Butch T's a cross?


Sorry to hear of your loss, but glad to hear your father is in a less painful place. It is nice he was able to keep uplifted in spirit through it.
 
Our prayers and thoughts are with you and your family Paul. From what you've posted about him it sounds like he as a great man who lived a wonderful and full life and who was especially blessed to have had you for a son. I'm so glad that you were able to spend time together there in the comfort of your home. I feel that he was able to pass knowing that you were in a good place and will be fine. Take your time to mourn and miss him. We all need that and know that we are all here for you and can't wait to see what your back yard is going to look like next grow.

Peace be unto you and your family,
Bill
 
Another great harvest. Those Tuca Mysteries look interesting. How is the flavor and heat? The Butch T's look interesting, also. Is that the typical phenotype from your plant(s)?
 
Just to echo what others have said...really sorry to hear the news Paul.
Thank you, Neil.
We appreciate your condolences.


Nice avatar pic :rofl:


Paul I just got caught up. Are those Butch T's a cross?


Sorry to hear of your loss, but glad to hear your father is in a less painful place. It is nice he was able to keep uplifted in spirit through it.
Thank you, Brian. We are of the same mind, and very grateful that, in
all, things happened for the best.

I don't know the history of the Butch T. It is one of the plants that
Spankycolts gave to me last Spring, all of which were great plants.


Our prayers and thoughts are with you and your family Paul. From what you've posted about him it sounds like he as a great man who lived a wonderful and full life and who was especially blessed to have had you for a son. I'm so glad that you were able to spend time together there in the comfort of your home. I feel that he was able to pass knowing that you were in a good place and will be fine. Take your time to mourn and miss him. We all need that and know that we are all here for you and can't wait to see what your back yard is going to look like next grow.

Peace be unto you and your family,
Bill
Thank you for the beautiful thoughts, Bill. Blessings to you and your family.
We take great comfort in the fact that we got to spend the last decade of
his life with him. We are in a pretty good place here. Our home seems a
bit emptier, and smaller.


Another great harvest. Those Tuca Mysteries look interesting. How is the flavor and heat? The Butch T's look interesting, also. Is that the typical phenotype from your plant(s)?
Hi Brent. Tuca is an interesting plant. Very late bloomer and setter, but
the pods set like crazy in the cool Fall weather. Haven't had a chance
to try one yet.

Those BT pods are pretty typical. They are more red when ripened in
warmer weather. That photo is about 90% of the harvest off that plant,
which grew in the shade of two giant Yellow Aji bushes!
 
Hi Paul, glad to see you up and around a bit.

Seed starting countdown... 5 weeks 'til it's time to start the late-season chiles!
Thanks, buddy, but Rick, you're scarin' me man! My grow shelf isn't ready, yet!
Looks like we might get our first freeze tonight - 31˚ predicted. That should bring
things to a head in the garden! Almost 6 3/4 inches of rain in the past two weeks,
in two storm systems.

The greenhouse plants are doing quite well. Night time temps about 44˚ , daytime
can hit mid 60's low 70's or more on a sunny afternoon. The new 6mm panels
seem to insulate beter. The close quarters make it tough to photograph, but I'll
try for some more pix when the sky lightens up a bit.

Wild Texas Tepin (Hippy Seed): pods ripening, foliage dropping, should get one
more harvest off the plant.

Peach Habanero (Fernando's seed): half-dozen ripe pods, ranging in color
from light peach to light orange. Removed several lower
branch tips (tw 2 weeks ago) that had aphid colonies;
so far no return. Will leave pods on the plant for now
to fully ripen any seeds.

Manzano (Shane's seed): 6 pods, all growing in size daily, some have set
since moving into the greenhouse. Abundant new growth
coming out of trunk and branch nodes.

Goat's Weed (Shane's seed): loaded with ripe/ripening pods, flowering and
setting pods profusely.

Wild Brazil (Shanes' seed): cut off one lower branch today with aphids trying
to gain a foothold. Loaded with ripening pods continuously,
will harvest more soon. Flowering and seting pods at a fast
pace.

Ghost (Spankycolt's plant): One dozen pods, almost perfectly ripe. Nice and
firm with good color. The plant is putting out new growth at
all the branch terminals. Very little flowering.

Yellow Aji (peruvian market seed, bushy phenotype): Pods large and firm, green
with significant corking on the older pods. One pod finally started
to ripen yesterday, and is proceeding quickly. Am hoping sor for at
least several of these pods to ripen. One pod got mushy and fell
off, but the rest are in good shape.

The greenhouse experiment continues. I may have to rethink how it is set up if these
plants do well. Their season has already been extended significantly, and these varieties
seem to like the cooler temps of Fall/Winter in the greenhouse. The Red Manzano
is really pushing out significant new growth at the nodes.
 
OK, so I can realistically only expect half a dozen or so Manzanos at the end of season 1, eh? That's all right... I'm in that one for the long haul! It's nice to see the Tepins have done well for you too. Take care buddy!
 
Nice to hear you are still getting ripe pods with less then one month until Christmas!! That greenhouse sounds like its worth its weight in gold!! Nice work Paul !!!
 
The greenhouse plants are doing quite well... The new 6mm panels
seem to insulate beter... The close quarters make it tough to photograph..

Sounds like a great variety of plants to grow over the winter. Glad to hear they are growing and podding up. Nice way to get rid of the aphids. Now that I have got my One-Stop Gardens greenhouse up, I have a couple of questions for you. When you got the new 6 mm panels, did you have to cut them to shape, or were you able to buy them pre-cut. Putting on all the pre-cut panels took a bit of time, I can only imagine having to cut them all, as well. Also, I can relate to the close quarters making it tough to photograph. Another close quarters thing are the handles for the roof windows. When propped open you really have to watch for them when moving around inside the greenhouse. I hit my head and both ears on them yesterday!

Will definitely be watching your winter greenhouse grow for tips!
 
OK, so I can realistically only expect half a dozen or so Manzanos at the end of season 1, eh? That's all right... I'm in that one for the long haul! It's nice to see the Tepins have done well for you too. Take care buddy!
It's not that bad, my friend :rofl: This particular plant was a real late starter; long
after the other plants were well on their way. The Rocoto that I started in Feb with
the others had 18 pods in all. Two more are showing color, so I'll pull about 14 pods
from that one. The Red Manzano in the greenhouse had at least 50 flowers setting
pods; if I hadn't cut almost 3' off each major branch there would have been a lot. It was
very prolific.


Nice to hear you are still getting ripe pods with less then one month until Christmas!! That greenhouse sounds like its worth its weight in gold!! Nice work Paul !!!
It seems to be pulling its weight for now. We'll see how far it will go.
 
Sounds like a great variety of plants to grow over the winter. Glad to hear they are growing and podding up. Nice way to get rid of the aphids. Now that I have got my One-Stop Gardens greenhouse up, I have a couple of questions for you. When you got the new 6 mm panels, did you have to cut them to shape, or were you able to buy them pre-cut. Putting on all the pre-cut panels took a bit of time, I can only imagine having to cut them all, as well. Also, I can relate to the close quarters making it tough to photograph. Another close quarters thing are the handles for the roof windows. When propped open you really have to watch for them when moving around inside the greenhouse. I hit my head and both ears on them yesterday!

Will definitely be watching your winter greenhouse grow for tips!

The plant selection was kind of an accident; just used the ones that seemed
to still be actively growing and setting pods at the time. If this is successful,
I'll try to be more proactive about being ready for large plants in the greenhouse
next fall! As for the aphids, I have cut branch tips (especially lower ones) off
several plants. That seems to be the best solution for me. The sprays, etc. are
hit and miss, cause adaptation/selection, and just plain messy in the greenhouse.

I found pre-cut panels on line, 2'x4'. I paid just under 150 dollars including shipping
for 8 2x4 panels. I still had to do a little trimming, but the small sheets are easy to
handle. I used my friend's Ryobi battery powered saw with a fine tooth blade and a
long rip fence to cut the plastic with little problem other than making sure the fence
and plastic are well secured.

:rofl: Sorry for laughing, but I have drawn blood on more than one occasion with
those #$)&^%@ window handles. I finally cut them off last summer to just below
the last hole and filed them round and smooth. It only took me 3 or 4 years to figure
that one out! :rofl:

The little greenhouse should work very well for you down in your area. I think you
will be very pleased with it. Looking forward to seeing pics of it full of plants!

Not a bad price to replace all the panels with better-than-OEM material. Especially when you can cut them to eliminate the gap-osis present in the original. Those little Ryobi saws are pretty slick. ;)

Don't worry about laughing, I was laughing at myself. You'd think I'd learn the first time I hit my head on one of those handles. But no...finally I started laughing at myself! I actually thought of you after the second or third time, wondering how many times you hit your head on the same handles! Great tip on the cutting and filing. Another project for another day.
The metal is soft and cuts easily with a hacksaw.
Took me about 10 minutes for both handles.

Took a few pics in the greenhouse a couple of days ago, then harvested and cut
back a couple of the plants. The Goat's Weed because it was about to be overrun
with whiteflies, and the Ghost because there are no more flowers or pods. The Red
Manzano was cut back to the second forks except for fruit the bearing branches. I also
cut back the plants I had in #1 and #2 pots; just leaving them in the greenhouse as is.
Will get a few pics of the aftermath later.

Wild Texas Tepin (HSC) getting ready for second harvest:
DSCN5029a.jpg


The bushy phenotype Yellow Aji has three pods with significant
color on them. I trimmed off all the large leaves and non produc-
tive branches and tied it up a bit. I discovered around 2 dozen
pods on the plant:
DSCN5028a.jpg


Peach Habanero (Fernando). Took a handful of pods from this one. Looks like there
are several more that will make it to ripeness:
DSCN5030a.jpg


Ghost Pepper (Spankycolts). Got one dozen nice pods off this one:
DSCN5037a.jpg


Red Manzano (Shane):
DSCN5035a.jpg


Goat's Weed (Shane). Harvested a lot of pods off this one:
DSCN5040a.jpg


Wild Brazil getting ready for final harvest:
DSCN5042a.jpg


Will post up some harvest pics and grow shelf update later today. Thanks for looking in!
 
Nice update Paul. Hey just a question where did you get the wild Brazil seeds?? They look nothing like my wild Brazil pods?? My wild Brazil pods are basically perfectly round and orange/yellow and taste like hot fruity skittles? I am wondering if there are more then one type of "wild Brazil" plant about the world??

In fact the whole plant looks entirely different with much more elongated leaves and a less compact habit compared with mine. Any signs of my care package I sent your way?? There might just be some of my phenotype of the wild Brazil seeds in there
 
Nice update Paul. Hey just a question where did you get the wild Brazil seeds?? They look nothing like my wild Brazil pods?? My wild Brazil pods are basically perfectly round and orange/yellow and taste like hot fruity skittles? I am wondering if there are more then one type of "wild Brazil" plant about the world??
I received the seed for this plant from Shane. I don't know its proper nomenclature.
You are probably right in that there are more than one variety of WB. I've seen some
plants referred as cumari this or that in the wild brazil context. I could be totally
misinformed there. Ha! It took a long time to set pods, and then a long time to ripen.

Here is a plateful of Wild Brazil pods I harvested a while back.
Typically, 15mm, or about i/2 inch is the normal length of these,
although there are smaller ones and an occasional longer one:
DSCN5022a.jpg


First harvest off of the Wild Texas Tepin:
DSCN5025a.jpg


Tepin cross. Pretty stubborn, although it got a very late start.
There are still about a dozen slowly ripening pods on the plant:
DSCN5023a.jpg


Tepin 15 (Shane's seed). Really stubborn, but also a late start:
DSCN5024a.jpg


These are the Peach Habanero from Fernando's seed:
DSCN5043a.jpg


Ghost pods:
DSCN5044a.jpg


Goat's Weed. They photgraphed dark for some reason:
DSCN5045a.jpg
 
Nice shots Paul!!
Thanks, Trippa! The little Nikon S550 pocket camera does a pretty
good job for it's size.

While I was away today, finished up the grow shelf. The ends and door panels are made from 1/2 inch
(13 cm) foam with plastic on one side and reflective foil on the other; R 3.2. Less than 12 dollarsUS for
a 4x8 sheet at Home Depot. Cuts very easily with a box knife and straightedge. Weighs next to nothing.
With the lights on the temp was around 78F after less than half an hour. Ambient temp 69F.

End panels, lights and fan motors:
DSCN5046a.jpg


Three door panels. I think this qualifies as ghetto getteaux since the hinges are binder clips hanging on screws, and utilizes all materials already on hand except the foam board and 1 qt. of paint:
DSCN5050a.jpg


All buttoned up and running the temperature test. Will check in a couple of hours to see what is:
DSCN5049a.jpg


Now I really can't wait to get some seeds going. I didn't start until Feb. 22 last year.
This year, I'm going to go a little earlier. Watch out, Stickman! I have to do something
about those door panels. The logos are going to drive me nuts very quickly :rofl:
 
Most excellent Paul! I'm looking forward to checking out your grow this coming season too.

It's time for me to start pulling everything together for my indoor seed starting also. I have almost all the seeds I want to germ for next year... just waiting on a package from Croatia, then it's cleaning up the grow area and setting it up for the new season. I'll still use the grow tent from last season to give the seedlings their initial push, but then I move them to a table under a couple of shop lights when they outgrow the tent. Your grow shelf is giving me ideas... I may make a cover out of reflective foam board and duct tape. Cheers!
 
Back
Top