• Blog your pepper progress. The first image in your first post will be used to represent your Glog.

Trent's 2014 Grow Log - COLD COLD COLD

Figure I'll keep track 2014 on here. At least then all my data will be in one place instead of scattered around on slips of paper.
 
First; PSA.
 
I'll *never* use the Jiffy starting pods / soil again.
 
I lost 95% of the plants in these two trays:
 
bNZv4wLh.jpg

 
The roots wouldn't form. They couldn't get any nutrients out of the soil, whatsoever, and tried to suck what they could from the layers of paper. 
 
Burpee trays with compressed peat were planted 3 weeks later and within 3 weeks were quadruple in size.
 
Finished transplanting all sprouts on Saturday (4-5-2014).
 
HZ99VoLh.jpg

 
xStYBqlh.jpg

 
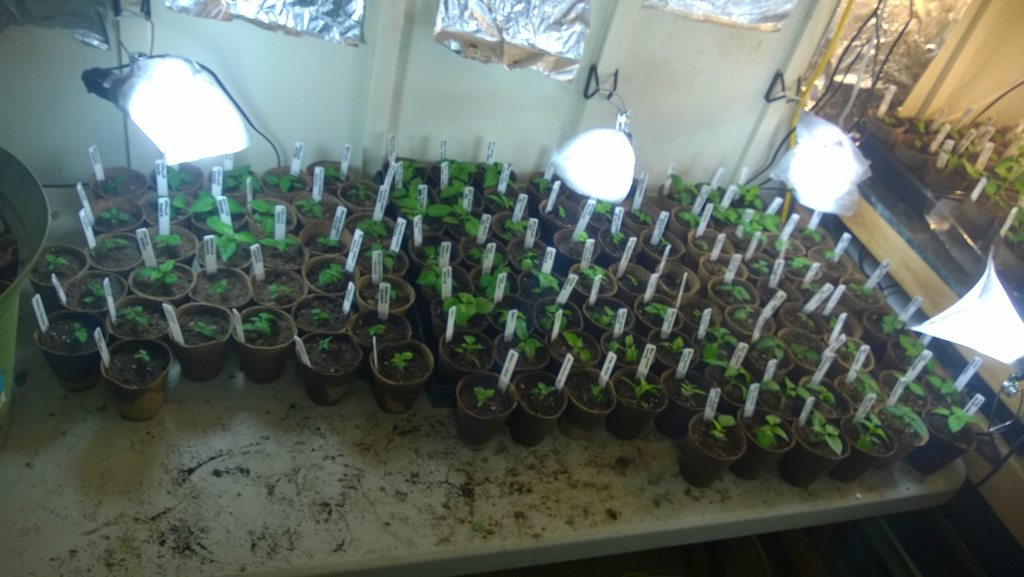
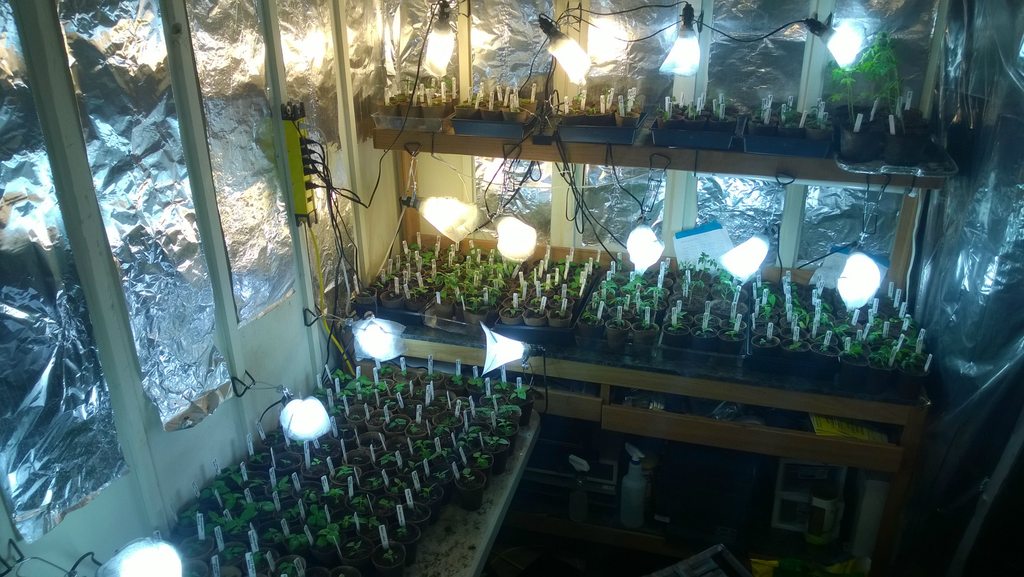
I might lose a couple transplants but here's the current count (all in 3" paper cups)
 
7 pod Barrackpore - qty 6
7 pod Brain Strain, Yellow - qty 5 
7 pod Brain Strain, Red - qty 11
7 pod Chaguanas - qty 7
7-pod Jonah - qty 4
7-pod Long - qty 11
7-pod Original Red - qty 7
7-pod Primo - Qty 3
 
Bhut Jolokia (brown) - Qty 2
Bhut Jolokia (indian carbon) - qty 6
Bhut Jolokia (red) - qty 9
Bhut Jolokia (yellow) - qty 7
Bhut Jolokia (white) - qty 6
 
Brown Moruga - qty 6
 
Carolina reaper - qty 23
 
Cayenne (Sweet) - qty 3
Cayenne (large) - qty 6
Chili de Abrol - qty 10
 
True Cumari - qty 1
 
Datil - qty 3
 
Dedo De Moca - qty 3
 
Dorset Naga - qty 3
 
Fatali, Yellow - qty 4
 
Giant mexican Rocoto - qty 4
 
Goats weed - qty 3
 
Habanero (big sun) - qty 8
Habanero (chocolate) - all died / no sprouts
Habanero (orange) - qty 4
 
Jalapeno (black) - qty 8 
Jalapeno (early) - qty 14
Jalapeno (giant) - qty 15
 
Mako Akokosrade - qty 3
 
Naga Morich (orig) - qty 6
Naga Morich (monster naga) - qty 3
Naga morich (bombay morich) - qty 6
 
Pimenta de Neyde - qty 3
 
Tobago (seasoning) - all died
 
Tobago Scotch Bonnet (red) - qty 3
Tobago Scotch Bonnet (yellow) - qty 5
 
Trinidad Scorpion (butch T) - qty 8
Trinidad Scorpion (Cardi) - qty 4
Trinidad scorpion (douglah) - qty 3
Trinidad scorpion Moruga - qty 7
Trinidad scorpion (orig) - qty 3
Trinidad scorpion (PI 281317) - qty 3
Trinidad Scorpion (smooth) - qty 1
Trinidad Scorpion (yellow) - qty 4
 
PI 281429 - qty 1
 
surviving overwinters in large pots:
 
7-Pod (orig) - qty 1
Bhut Jolokia (red) - qty 2
Bhut Jolokia (giant) - qty 1
Yellow Bhut jolokia - qty 2
Carolina Reaper - qty 4
Cayenne - qty 1
habanero (golden) - qty 3
habanero (tazmanian) - qty 3
Naga morich - qty 1
naga Viper - qty 2
Trinidad Scorpion - qty 1
Butch-T Trinidad - qty 2
Trinidad scorpion moruga - qty 3
Yatsufusa - qty 1
Scotch Bonnet (red) - qty 1 (sole 2012 survivor)
 
Total 3" pot transplants: 264
Total overwinters surviving: 28


millworkman said:
Ahhhhhh, awesome!
 
Well, expedient.. not really awesome.
 
Trying to make a mesh cover for lights with aluminum window screen mesh turned out to be incredibly difficult. Especially since ladybugs can get through the TINIEST of openings.
 
It involved about a dozen "screw it" throwaway attempts, then finally got a pattern that (more or less) worked good.

Along the way I had my fingers and thumbs punctured dozens of times and lost more than a little blood. Used up half a box of staples making those damn covers.
 
Well, the worst part is the lady bug larvae (ugly looking creepy things) can get through even TINIER holes, and they also love light and warmth for some reason. 
 
So no matter what, I don't end up getting a very strong 2nd generation of lady bugs. The larvae hatch from the cocoons, crawl up to the lights, and fry before they can really do much damage to the aphid population, or make a shell and morph in to a ladybeetle.
 
It will be very difficult to avoid the insects and larvae get into the nooks and crannies. It occurs to isolate lamp (and all), inside a glass bottle 1 gallon. passing the wire through the insulating cap and the hole. 
 
So would force the ladybugs to nest in a safer place.
 
Yeah I was going to do the HID transition last year but by the end of the year, I was just worn right the hell out. Had enough gardening for the year, put my overwinters in the basement and hung some lights over them.
 
A month later the "aphid invasion" kicked off in full storm.
 
Tried various soap sprays, hurt the plants and didn't eliminate the aphids (I let it go too long before starting - they were overwhelming, millions of the damn things.) 
 
Was very fortunate to have ANY plants survive at all, they were so bad. Every single leaf had hundreds of the damn things crawling on it.
 
Ladybugs did in 3 days what three rounds of soap failed to do. Eliminated them. But.. eggs kept hatching.. eventually they came back and the ladybugs were dead. More lady bugs... (and overnight air expenses...)... same thing. 3 days later, not a single aphid to be seen. A week later, all ladybugs dead.
 
A month later .. back again.. GRRRR!
 
By the time they were back the third time I already had my sprouts going. Too damn crowded to try to change out a lighting system at that point.
 
But next year? Man once I get the grow room cleared out... it's REMODELING TIME!!!! new grow shelves, new lights.. new everything. I'll have a dedicated 15x10 *room* for growing!
 
TrentL said:
 
Because I'm using ladybugs to control aphids.
 
If I don't wrap the lights, they crawl up in to them after they shut off and when the lights kick back on, they get COOKED.
 
It killed off the first two batches of 1500 ladybugs I'd released, before I finally figured out what the problem was. (Massive collection of dead ladybugs under the lights....)
 
Since I've wrapped them, SOME have found a way in to the lights through the mesh, but for the most part, it keeps them out and alive.
 
In a couple places the mesh touches the lights on top, and I've cooked a few dozen there, but it's been over a month since the last release and I still have quite a few alive, crawling around, eating aphids all day.
 
Well, when they aren't doing this....
 
1arIDZyh.jpg

 
They're horny little buggers... spend all their time eating, sleeping, and humping.

 
Hey if you had short life like they do, you would be lots mo busy too ;)
 
Pretty smart covering the lights too!
 
Several years ago I insulated a shed in an attempt to make a homemade cooler for deer season. I went in there in mid winter (Tejas winter) and there were just thosands of LB's in there.
 
Overwinters will be getting some fresh air tomorrow! Next 5 days have a high of 70+. I'll keep 'em in the shade during the day, and in the garage at night.
 
With the overwinters (FINALLY) out of the grow room.. I transplanted a bunch of annums and a few of the larger chinese to 6" pots today.
 
ueITZSoh.jpg

 
I don't know WHAT I'm going to do if the rest of these need a transplant before going outside...
 
FnTkaH4h.jpg

 
OjBOxw0h.jpg

 
Ni1rdFuh.jpg

 
And the H2O2 (hydrogen peroxide) experiment continues.. new shoots formed on the plant today outside!
 
DAxhTdQh.jpg

 
(Had to put my dirty hand behind it to get the camera to focus...)
 
Glad to see the OW's coming back.
 
And I'm sure you're in same boat as many; just where am I going to put all of these?
 
Half the fun I say!
 
Glad things are going well for you.  As close as you are to plant out, I wouldn't be too worried about potting up.  Perhaps if they're in a 72 cell tray, but if you're going 3 1/2 to a 6 with your plant out within 4 weeks, if not sooner, I wouldn't sweat it.
 
Looking good.
 
HillBilly Jeff said:
Glad things are going well for you.  As close as you are to plant out, I wouldn't be too worried about potting up.  Perhaps if they're in a 72 cell tray, but if you're going 3 1/2 to a 6 with your plant out within 4 weeks, if not sooner, I wouldn't sweat it.
 
Looking good.
 
Well these damn peat cups I was dumb enough to use (these damn things are driving me nuts.. NEVER AGAIN)... I don't get *nearly* as much soil as a standard 3 1/2 nursery cup. 
 
The problems are many:
 
#1 peat cup causes a huge surface area to evaporate water. (Upside, can't hardly overwater them and if you do, set them in front of a fan for 1 hour; downside, they dry out FAST)
#2 mold/fungus. Because the cups are always wet any mold spores floating around WILL FIND YOUR POT.. period.. lots of fungus / mold issues right now.
#3 roots - roots don't "circle" and keep growing. They try to grow out the sides of the pot, find light, and die. They also get pruned or pinched off as they grow.
#4 decay - pot slowly decays, which is supposed to be an upside, but not when you're trying to keep plants alive in them for 3+ months... 
#5 repotting - if they outgrow the pot and you want to ditch it, it's tough. Only way I've found is to supersaturate the cup and peel away the layers of peat /cardboard crap to slowly liberate the roots that grow in between layers of paper...
 
I could go on, but you get the idea. WAY more complaints than plastic cups. Plan on using plastic next year when I go from 72 to 18... :)
 
They take up as much room as a 3 1/2 nursery cup but they don't have the *capacity* of them. 
 
The plants "peak out and stall" much faster in these.
 
I bought some of those peat pots a year ago. Used a few and said F-it. Watering them every day is a pain.
 
Your point #3 is usually considered a plus though. I've bought many fabric grow bags just for that purpose. The one and 3 gallon bags I have don't dry out as fast as the peat pots, thank goodness.
 
Yeah the auto-root-pruning isn't TOO bad. But I don't want to bury a fungus-laden paper pot inside a bigger plastic pot, so tearing the peat pot off is for peace of mind... but it's a pain, to not tear roots. I shed about 40 of those paper pots today when I was repotting to 6".
 
They're great IF the intended purpose can be realized - as you truly don't get transplant shock when you drop those bad boys in to the ground. But maintaining them prior to plant out is just a nightmare.
 
I'd bought those 6" pots at wally world last year not knowing any better. They don't have true drain holes. It caused some serious problems with root rot because they don't drain properly; there's a "cup" snapped over the bottom, that's supposed to let excess water out, and a small resevior, but leaves 1" of water standing in the bottom of the pot.
 
I took care of that with a 3/8" drill bit and a cordless drill today. Won't have that problem again this year; each pot has 4 nice pretty holes straight through the bottom now.
 
I *also* took that drill to the overwinter pots today - larger versions of the above, and the only common factor in the 5 overwinters I killed off this year.  (All of the "survivors without issue" were in DIFFERENT types of pots.)
 
The scotch bonnet that I'd dumped a gallon of hydrogen peroxide in two days ago finally drained. :)
 
So ... hopefully no more over-saturation issues moving forward.
 
You actually need some transplant shock cause you really need to tease the roots when you plant them.  They bounce back quick.  I have potted up a lot this year already and didn't see any shock except for the 5 sweets I had in one pot and just ripped out the 4 weaker ones and stuck them in another pot.  Thought they would croak with very little root on them, but they all bounced back.
 
I shocked a 7-pot long today but it bounced back quick. I *dropped* the damn pot as I was trying to tear off the paper cup, and it took a nose dive on to concrete 4' below where I was holding it.
 
After potting it up it wilted rapidly. So I gave it a good dose of water. Just checked it, as I was down in the basement gathering materials for an NRA basic pistol class I'm teaching tomorrow, and it'd plumped right back up again! Sturdy little buggers!
 
When I repot or plant out and find root-bound systems, I'll tear in to them mercilessly to get them unbound.
 
Leaving the oscillating fan on overnight down there as I've got some edema on the annums showing up.
 
I bought some of those pots you mentioned, and they were drilled out for the same reason.
 
The wind blew a Jal over 2 weeks ago, it really hit hard, upside down direct hit, broken badly. And of course I found it at the end of a 85° day, so it looked horrible. Stuffed it back in the solo cup and watered it, placed it in the shade. It's now planted in the raised bed and coming on strong. It amazes me how resilant they are.
I've never used the cardboard pots, but have purchased some plants that grown in them. Bonnie comes to mind. It's like peeling a hard boiled egg..
 
I never let my plants get root bound :liar:
 
Back
Top