-
Do you need help identifying a 🌶?
Is your plant suffering from an unknown issue? 🤧
Then ask in Identification and Diagnosis.
You are using an out of date browser. It may not display this or other websites correctly.
You should upgrade or use an alternative browser.
You should upgrade or use an alternative browser.
Your best heating pad
- Thread starter hot stuff
- Start date
This one for small spaces / trays. It works great for germinating one tray at a time. I'd recommend starting here with a temp controller.
This one to heat my entire grow box in the dead of winter. You certainly get what you pay for.
This one to heat my entire grow box in the dead of winter. You certainly get what you pay for.
As an Amazon Associate we earn from qualifying purchases.
I'm using the Hydrofarm 48" x 21" mat and have no complaints with it. I also use the Jump Start temperature controller.
Here in Melbourne, Australia, we have a temperate climate with winter night temps from 1 deg C to 5 deg C overnight, and daytime temps around 15 deg C.
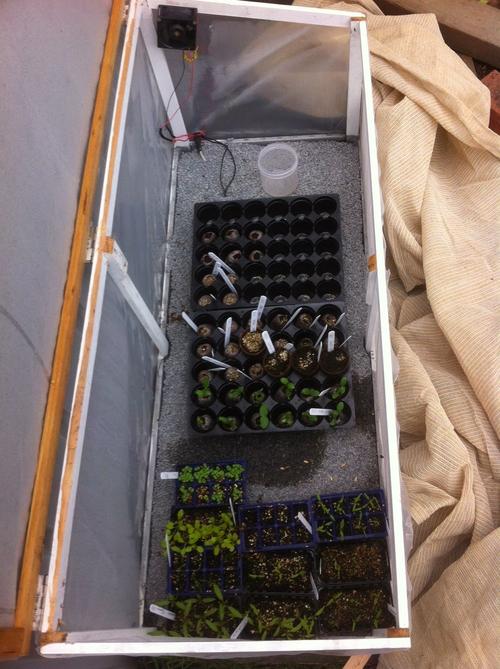
I start all my seeds in a dedicated starting frame, shown here:

The frame is covered in transparent builders plastic (to keep wind and rain out), has a solid base (Marine Ply), with drain holes and a few lengths of treated 4x2 as feet, so it has an airgap between the ground (concrete) and the base. I also glued some styrofoam underneath for added thermal insulation.
To answer your specific question, the heat comes from heater cable/cord, that is "snaked" in a series of "S"'s across the bottom, covered by some fine gravel which acts as a heat spreader, and provides drainage after watering. This is the type of cable I use [SIZE=11pt]http://www.actrol.com.au/Products/Electrical/Drain-Heaters/Thermon-FLX-Cables/. You can see the cable entering the gravel in the top left. The temp probe for the thermostate is the pair of black wires next to it. [/SIZE]
[SIZE=11pt]It's not that expensive (I paid $12 AUD per/m). its robust, water proof, long lasting as it's used to keep drains clear of ice in industrial freezers. Those of who live in areas with snow will find similar products to keep guttering ice free. I use a simple high temperature thermostat to turn it off when temps reach the desired target. WARNING : These heater cables run off mains electricity. 110v AC might not be too bad but 240v AC requires some respect. Unless you know what you are doing, and how to seal the connections from moisture ingress, I would suggest you use something off the shelf. [/SIZE]
Once the seeds are started, I move them to the seedling box.

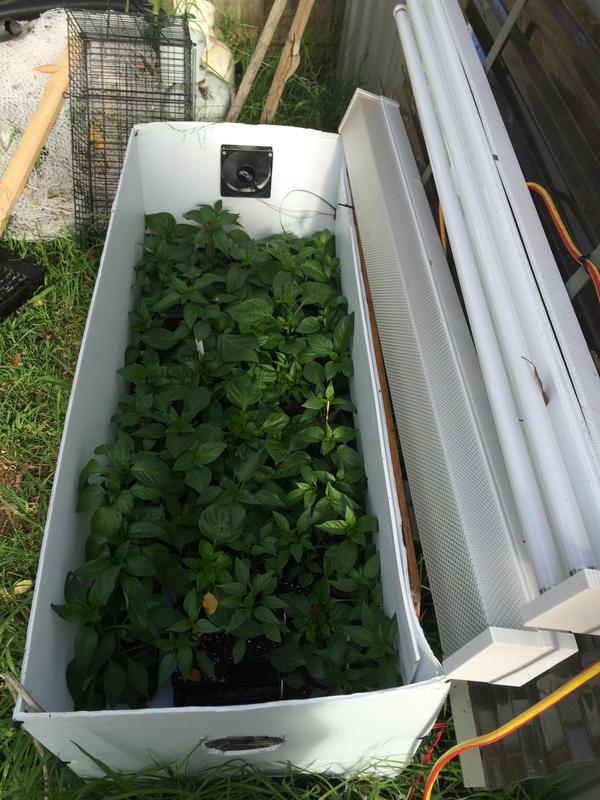
This box is heated using the same principle. I needed to construct something quickly so I used corflute which has worked well. A recycled computer fan at each end keeps air flowing thru what would otherwise become quite humid. With the heat from the base and light from top, the seedlings get off to an awesome start before planting in the ground....
I've noticed something else which I think might be unique to growing outside. Despite being an ideal environment for an aphid bonanza, I seem to suffer from none. When the lights are on at night, the box is FULL of all sorts of species of swarming inspects. Despite being overcrowed to the maximum, I've noticed nothing determental...and I could count the aphids on the fingers of one hand...I'd say the light attracts enough predictors to keep the aphids in check.
If you have the space, and you can start outside, think about it. Think BIG I say. I use this kit for starting my peppers, tomatoe, melons, corn. I have limited growing space in my suburban backyard so I go for maximum overlap, and every bed I grow the peppers in has a crop growing before them (onions, garlic, greens, potatoes) and I normally plant my peppers out when they are well advanced in the pots to get maximum utilisation from the grow beds.
OK - I might have gone overboard answering your question, hope it helps.
Cheers
Luke
I start all my seeds in a dedicated starting frame, shown here:

The frame is covered in transparent builders plastic (to keep wind and rain out), has a solid base (Marine Ply), with drain holes and a few lengths of treated 4x2 as feet, so it has an airgap between the ground (concrete) and the base. I also glued some styrofoam underneath for added thermal insulation.
To answer your specific question, the heat comes from heater cable/cord, that is "snaked" in a series of "S"'s across the bottom, covered by some fine gravel which acts as a heat spreader, and provides drainage after watering. This is the type of cable I use [SIZE=11pt]http://www.actrol.com.au/Products/Electrical/Drain-Heaters/Thermon-FLX-Cables/. You can see the cable entering the gravel in the top left. The temp probe for the thermostate is the pair of black wires next to it. [/SIZE]
[SIZE=11pt]It's not that expensive (I paid $12 AUD per/m). its robust, water proof, long lasting as it's used to keep drains clear of ice in industrial freezers. Those of who live in areas with snow will find similar products to keep guttering ice free. I use a simple high temperature thermostat to turn it off when temps reach the desired target. WARNING : These heater cables run off mains electricity. 110v AC might not be too bad but 240v AC requires some respect. Unless you know what you are doing, and how to seal the connections from moisture ingress, I would suggest you use something off the shelf. [/SIZE]
Once the seeds are started, I move them to the seedling box.

This box is heated using the same principle. I needed to construct something quickly so I used corflute which has worked well. A recycled computer fan at each end keeps air flowing thru what would otherwise become quite humid. With the heat from the base and light from top, the seedlings get off to an awesome start before planting in the ground....
I've noticed something else which I think might be unique to growing outside. Despite being an ideal environment for an aphid bonanza, I seem to suffer from none. When the lights are on at night, the box is FULL of all sorts of species of swarming inspects. Despite being overcrowed to the maximum, I've noticed nothing determental...and I could count the aphids on the fingers of one hand...I'd say the light attracts enough predictors to keep the aphids in check.
If you have the space, and you can start outside, think about it. Think BIG I say. I use this kit for starting my peppers, tomatoe, melons, corn. I have limited growing space in my suburban backyard so I go for maximum overlap, and every bed I grow the peppers in has a crop growing before them (onions, garlic, greens, potatoes) and I normally plant my peppers out when they are well advanced in the pots to get maximum utilisation from the grow beds.
OK - I might have gone overboard answering your question, hope it helps.
Cheers
Luke
zing said:I just use a single size mattress electric blanket with a waterproof tarp ontop, $15
Where do you find electric blankets for that price?
hot stuff said:Do the controllers dip a stick into the dirt? If so that is a problem for me because I germinate in jello shot cups on top of moist napkins. Or do they use ambient air temperature?
Temperature probe inserted into the soil. You might be able to wrap it in a moist napkin and place it in a shot cup on top of the mat.
hot stuff said:Do the controllers dip a stick into the dirt? If so that is a problem for me because I germinate in jello shot cups on top of moist napkins. Or do they use ambient air temperature?
https://botanical.com/hydro/propagation/18069_MTPRTC_instr09.pdf
PDF file download.
