• Blog your pepper progress. The first image in your first post will be used to represent your Glog.

Patrick's 2011 Grow Log

Here we are again. I can't believe how fast the time goes by anymore. My pops always said the older you get the faster it passes us by.

I am especially excited about this year, I'm going to try and cross a couple of peppers, on purpose! Haven't made the final decisions yet though.

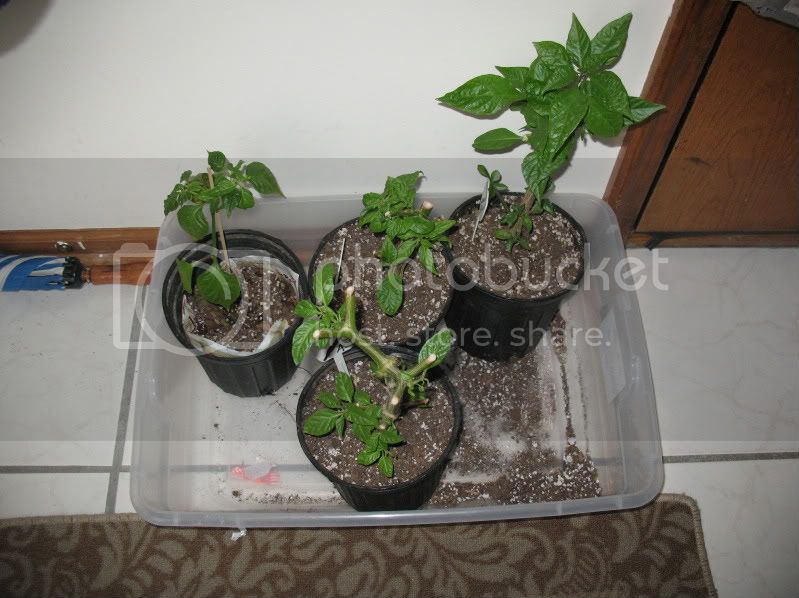
Anyway, here's a few that I overwintered. The one on the left came from a 7 Pod Barrackpore cutting. It struggled for a bit but the roots are starting to grow so I'm hopeful. Center front is a "large" 7 Pod, center rear was a very robust Dorset Naga and the one on the right is a 7 Pod Primo. The latter three I removed from 5-7 gal pots, trimmed the roots and cut them down to just the stem. They sat in my foyer where they got some limited sunlight through a window. I'm very happy with them.

IMG_6508.jpg


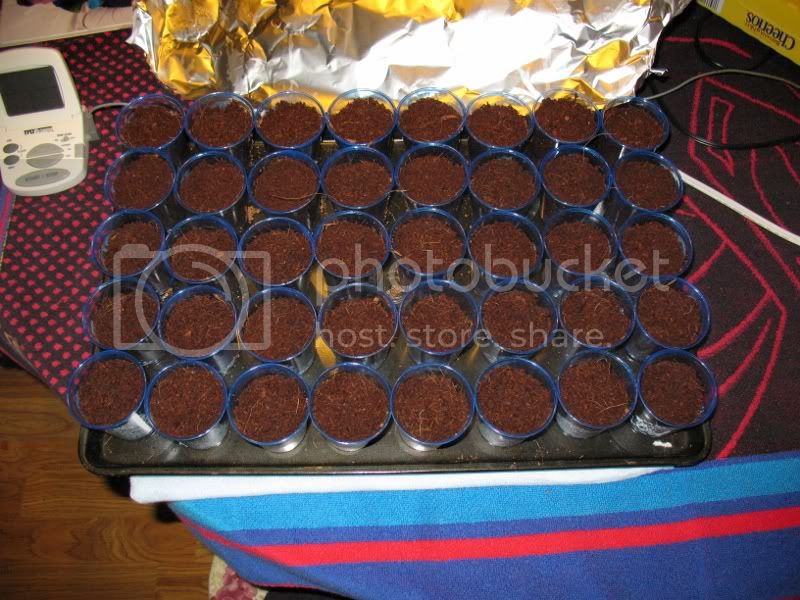
This is the first tray of seeds I stuck in coco coir last night. I've had success before with this medium as a seed starting mix so see no reason to change. It is nutrient poor so I start using fertilizer at an early stage in the plants life, at a very reduced rate.

IMG_6506800x600.jpg


Here is what I've started so far:

7 Pod, Brain Strain PRF…………………………..………........ 5
7 Pod, Brown Judy………………………………..………............ 6
Bhut Jolokia, Yellow…………………………………..………........ 5
Pimenta Tiger, AISPES004...................... 5
Trinidad Scorpion, Butch T Judy…………….………...... 8
Trinidad Scorpion, Chocolate AISPES108…....……. 5
Trinidad Scorpion, Morouga HSC……………….……....... 5
Trinidad Scorpion, Yellow AISPES109..……....... 5
Trinidad Scorpion, Yellow 2 SS………………….………..... 5
Trinidad Scorpion, Yellow Morouga AISPES107...…3

Not all of them are in the photo.

They are on a cookie sheet which is on a heat pad. Current temp in the coco coir varies from 75F - 80F. I would like it warmer and may mess with the heating pad settings. I plan on picking up a couple of heat mats tomorrow for more trays.

I have several other varieties to get started and would like to keep my total at under 90 plants.

Here we go! :woohoo:
 
hello Patrick! i have not been plagued with aphids yet. My wife's tomatoes in the garden (last year) got them but they never touched my peppers (annuum, frutscens, and chinense all within ten feet of the tomatoes)i never saw a one.. so i am wondering with a relatively closed environment as you have with inside growing... where do they come from? i guess i should really put this in a topic of itself.. but i am curious about your personal growing input first so if you see it in another topic from me take no offense.


Your grow log is amazing, btw!!!!!
 
Thanks WGB and Mike.

Chillihead_benny happy to explain where they came from. Plants I over wintered. I'm thinking the aphids bury themselves and hibernate in the dirt or lay eggs in it. Around the middle of February I placed the peppers near a southwest facing window and they got some sunshine and leaves started growing. Evidently that was enough to warm the dirt and signal to the aphids spring is here, time to get up and eat. At the mature stage the damn things grow wings and it didn't take long for them to find the babies. The moment I found the first aphid I set the over wintered plants outside. Next night temps hit the mid 20's and killed the plants. Killed the freaking aphids too and I'll take the push.

Now every week when I sit down to water the young ones I go through each plant with a magnifying glass, a small paintbrush and a cup of chemical aphid death. I need to start doing it every couple of days as they're showing up on more peppers every time. When I can get them outside I'll hit them good and hopefully I won't have to deal with them much more. The stuff I'm using isn't organic and I used it last year for the first time. Sprayed the plants real well early in the season and didn't have an aphid problem for the rest of the year. After using the organic stuff the previous four seasons and never seeming to get ahead of the darn things I'm sticking to the nasty stuff.

Sorry for the ramble.

Here's two watering days of murdered aphids. Probably less than half of what I killed. Not all of them stuck to the brush. Nasty SOB's.

009800x600-2.jpg
 
what are you using? i bought a bottle of malathion which is hear is pretty damn good. i sprayed once so far at half strength because i only saw a handful.
 
It's Ortho Bug B Gon Max Lawn and Garden Insect Killer. Concentrated death in a bottle. The active ingredient is Bifenthrin.
 
Little bastards are taking over my grow room.. or they were, until I got some Safers End All :twisted: I find a few now and again. I find pleasure in squishing them between my fingers and hearing them pop, now If I could do the same to deer. :think:
 
A friend of mine in Minnesota has a unique solution to his deer problem. He uses a paint ball gun, but keeps the paint balls in the freezer.
 
A friend of mine in Minnesota has a unique solution to his deer problem. He uses a paint ball gun, but keeps the paint balls in the freezer.

Are the deer protected, why cant you just shoot them or is it cos you live in suburbia. Maybe a crossbow and load up the freezer with venison. mmmm
 
Marc,

In the states you need permits to hunt deer and there are very specific times of the year that you can do it. You cannot randomly kill them when they bother you.
 
Nice journal the plants looks awesome, I'm learning and getting so many DIY ideas just going through these threads.

Thanks!
 
I was hoping to skip a step this year, potting up from the 20 oz cups to the one gallon containers instead going straight to the 5+ gallon containers. But it's probably best if I don't skip it. I was peaking at the bottom of a few of the cups and every drainage hole was full of roots. Thought I would share a few pics of how I do it inside. Too cold to be outside doing it. This is about the least messiest way I know of. If I was outside I'd be flinging dirt everywhere and having a damn good time. But.......

Anyway here's the future containers:

008800x600-1.jpg


The newspaper is to block the holes in the bottom and the lower sides. Water can get still get through so no worries about wet feet. There's also a couple of inches of my growing medium in the bottom to keep the paper down. That I did do outside and got stuff all over the porch!

Here's my growing medium; it's a mix of Pro-Mix HP, Happy Frog Soil Conditioner, worm castings and some Alaskan Humus.

009800x600-3.jpg


It's obvious what I do so no reason to 'splain each step. However I will post some pics.

011800x600-3.jpg


The reason why I'm potting these up.

014800x600-3.jpg


More to come.....
 
The hole without the cup.

016800x600-2.jpg


Done with this one.

019800x600-4.jpg


Took me a little over an hour to get six of them done and that's at my pace. Slow. Real slow.

Six down 50+ to go. :lol:
 
Hey Patrick.So this is the other addictive hobby you were telling me about. :) It looks like you have been busy getting things ready for the growing season which i hope is very productive for you.
 
Thanks Millman. Pretty sure it's a reciprocal thing.

John it is great to see you here. You get that list put together yet?
 
Very timely as I have some 1 gallon pot-ups to do. It makes for a nice centered plant there in the donut hole. I've also heard in a few places peppers like to eat newpaper print, so good tip there also.

Hmmm, maybe will try same thing on my smaller pot-ups, too. (Always kinda hard to get the 2.5-inch rootball to go straight into the beer cup--square peg in a round hole problem.)

Thanks Patrick!.... :cool:
 
Thanks for the comments guys.

This is pretty much how I pot up every time. I don't pack the medium in the bigger pot too tight around the cup, the roots need to be able to get through it without a lot of effort. After a couple of waterings the mix will settle some and leave room at the top for more which I'll add.

I was a little concerned about the tan color of some of the roots, thought they might be rotting. After putting the sniff to them and feeling how solid they are I've come to the conclusion my fertilizer may be staining them. The plants sure don't look like they have rotting roots. I may spray the exterior of the roots with a weak Hydrogen Peroxide/water mix.
 
Back
Top