smokers Finally, a Smoker I Can Call My Own

I think I figured out my first mistake:

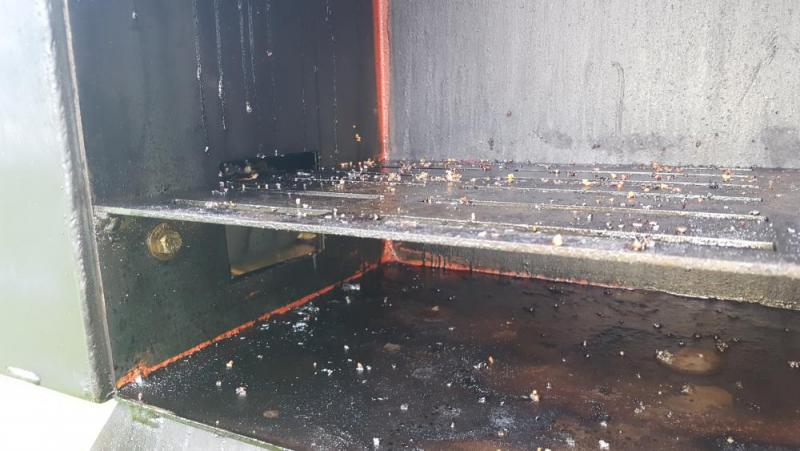
Ok, this is the 12"X12"X12" firebox, empty, facing the smokebox port. Note that the lower grill shelf is placed @ approx 1" below upper edge of the port.

20190705_103359.jpg


Now the same angle with the coal tray, just as it was all day Thursday. It looks to me that in my desire to accommodate a cleaner burn I also restricted efficient heat transfer, eh?

20190705_103247.jpg


From the smoker box side it's pretty obvious how even more tranfer restriction is created by the simple placement of food...A couple more shelves, wire-grill style, could make a heck of a lot of difference.

20190705_103020.jpg


Andy, you're right, I WILL get it dialed in. I forgot to mention the sausage hook rail Mike installed in the roof, that's going to get some use too!

2019-07-06 10.01.04.jpg


Anyway, until I get a proper coal tray and read up on this minion setup I'm going to try setting the foil pan into the firebox at a 45° angle and situate it closer to the firebox floor.

Update on those ribs: they were perfect after an hour and a half finishing in a slow cooker.

Thanks for the input guys! Keep it coming!!!
 
Don't shoot the messenger.
 
URGH.  I hate to ruin your day but....... That's the problem, the firebox outlet should be at the top to let the heat roll out. The other problem is the firebox itself should be lowered to  give you more cooking area. The way it is now is you have just the top rack to cook on even if you cut another hole higher in the firebox. I would drop the firebox down so the top is 5" above the bottom of the cook chamber. Weld a piece of plate 6" wide by the depth of the cook chamber about 1/4" above the firebox outlet as a heat deflector to send the heat to the side of the cook chamber and it will make the smoke rolls out and even out the cooking temps across the cooking grates. It will draw better and cook at the temps you need with a proper exhaust.
 
It should be a relatively easy fix, cut it off the cooking chamber and add a piece of plate to close it off. While he's doing that have him install some legs.
 
With these changes I would guess you should get 6-8 hours out of a basket of charcoal, run it like a drum.
 
Dang, another thing is the air inlet is too high, it would work better if it was lower but it may work fine with these other changes. 
 
If you give me the measurements I'll run it on a calculator to get opening sizes. It's a little confusing to use if you haven't played with it.
 
 
Good Luck and if all else fails you can always run it using the minion method in the cook chamber but that will take some practice to get the temps right.
 
Pretty sweet little rig. RG has some good suggestions to tweak it. If friend's son plans on building more there are a couple of things he could look at.

Mount fire box lower so opening is below any cooking grates, reverse flow would make it a rock steady cooker. Basically a plate of steel below the cooking grates that forces the smoke to go to opposite side of the cooker before coming up into the cooking chamber. Mount the exhaust stack on same side as the firebox. In that design it would force the draw of smoke and heat to go left to right then right to left from firebox to exhaust.

Edit: just to be clear the plate would have a hole in it at the right hand side of the chamber opposite the firebox opening. . Some I have seen just leave a slight gaps from plate to right hand wall. Others use round holes with full plate welded in place. I don't think there is any difference really in how it works.
 
Thanks guys, and no Rob, you can't ruin my day. This is going to be fun, and the kid is going to get a YUGE edjumacation, as am I. The smoker is simply mis-assembled. Thing is, Mike is going back to the Springs on Monday, so I'll need to do most or all of the modifications on my own.

Only I don't weld. But I know guys....

Nothing you and Ashen have mentioned will even be a pain in the ass, though I'm pretty sure the legs will require amputated...
 
The box flipped easy enough, and though the legs will be ok, I did have to do a crappy looking trim. But the hole still lines up the same.

2019-07-06 16.39.55.jpg


2019-07-06 16.42.05.jpg


Hopefully step one is sufficient.

I'll get some measurements and make arraingements with a local guy to help me put the rest together.
 
I would run it with just the firebox flipped for awhile. See how it works. The reverse flow thing is only something that I would worry about if you notice a hot spot or you still have problems with cooks. If he is building more to sell , reverse flow is an up selling feature though.
 
Ashen said:
I would run it with just the firebox flipped for awhile. See how it works. The reverse flow thing is only something that I would worry about if you notice a hot spot or you still have problems with cooks. If he is building more to sell , reverse flow is an up selling feature though.
  

I'll let Mike know, thanks!

Rajun Gardener said:
From the looks of the bottom shelf it should work almost like a backflow plate.
 
post-12393-0-38509000-1562424715_thumb.jpg

 
Edited to say: He might even have to make bigger grooves to allow more airflow.
It did cross my mind , considering where he placed that bottom shelf and the spare slotting in the sheet metal, that it might make for a decent deffuser. It makes two more shelves that much more important. And wire shelves to boot. I've got a lb. of coal going, will check temps shortly.

Thanks again, gents! You boot mahooty!
 
Definitely a better burn, I'm wondering about perhaps drilling a few 1/4" holes across the bottom of the firebox door for a minimal lower fresh air intake, that or devise an interior redirect to force fresh air downwards from the existing vent.

After the coals (standard Kingsford briquette) had burned an hour or so I used a meat thermometer (all I got that I trust for the moment) in the smokestack and got an eventual reading of 164°F. Then I opened the smoker up and checked @ the smokin' hole from the firebox. I got to 300°F. That was with around a lb. of briquettes. So we know it WILL get hotter. I need to install an appropriate thermometer, but I think this establishes that the unit will cook with relocated firebox.

Other modifications will come, I've found wire grates of the right size at Char-Grill dot com, I intend to order up a nice side-mount chimbly from the link Rob offered, either have shelf holders welded for me or will drill and bolt them myself, and take care of whatever else needs done to create the epicurian delights I see you fellas post on these pages...

Ok Rob, exactly what measurements are you interested in? Firebox is 12x12x12, smoker is 18wX12dX24h. The port & exhaust dimensions were taken @ Feldons site.
 
The firebox and cook chamber are spot on so no worries there.
I guessed the firebox to cook chamber opening to be 3"x4" and it should be 13.82 sqin so you can make that a little bigger. Maybe 1/2" wider.
The air intake to firebox guess was a 1.5" circle and there should be 3 of them so you do need more air.
It should have a 3" exhaust 12.23" long OR a 4" exhaust 6.88" long.
 
Here's where you can go a different route from the calculator to get the same results.
 
Before I do anything I would order that 4" "L" shaped exhaust in the link and install it 4" below the top opposite from the firebox. That bigger exhaust will give you more draw and you shouldn't have to change anything else except maybe the air intake size if it doesn't work the way you like it. The exhaust has a cap so you can adjust it to change the flow and since it's a bolt on, you can easily remove it to cut it down and reweld the allthread to mount the cap back on it. All easy fixes but I would go the easy route first before I start cutting on it.
 
 
Rob, the fresh air intake is cut on a radius of a 3" diameter circle, two 1"X1" cutouts inside that radius, with the pinwheel damper, positioned dead center (too high?) of the firebox door.

The firebox-to-cook chamber pass is 4 & 3/16 by 3 & 1/4 inches.

Exhaust is 3".

I'll bolt a plate to the hole on top when I install the side chimney.
 
Back
Top