I'm chomping at the bit to get started with some new chilli varieties this coming Spring. So far I've just scratched the surface with Poblanos, Jalapenos and Serranos, all of which I really like. I've been egged on by a new Second Generation Mejicano neighbor as we've talked about hot chillis over the back fence! He helped me make some Pico de Gallo with my Serranos and Early Girl tomatoes and has some great recipes from his mother and grandmother. Hopefully I'll be able to share some of them on this forum in the future. I need to grow more Cilantro. Oh yeah!
I've ordered seed from several sources which received at least a few good comments on this forum (6/12 - items crossed out did not germ, or weren't planted this year):
US Hot Stuff:
Bolivian Rainbow
Yellow Peter
Nosegay
Trinidad Scorpion (from Spankycolts)
Devil Tongue
The Hippy Seed Company: Seed Packet Mixes
NuMex Twilight (from Siliman)
Yellow Jellybeans
Tom Thumbs
Wild Texas Tepin
Refining Fire: Seed Packet Mix
Scotch Bonnet
Chocolate Habanero
Jamaican Red Mushroom
New Mexico State University:
Chiltepin
Omnicolor
Red Carribean Habanero
Orange Habanero
Pepper Gal:
Aji Yellow (request from a Peruvian friend of ours!)
Thai Hot
Peppermania:
Inca Lost
Fatali
White Habanero (from Spanky)
Red Savina (cross with Fatali, from Spanky)
Bishop's Crown
Inca Red Drop
Orange Rocoto
Congo Trinidad
I doubt I will be able to try all of these out this year, but I have saved my seeds in small glass jars with tight-fitting lids for storage over the next year. I have been saving seed from other garden produce and have had good luck with germinating them after two or even three years. The jars are stored in boxes in the garage for a cool dark location for them. I have ordered several compact varieties with an eye toward trying to winter over some of my plants this year. Since I didn't even know peppers were perennial, I can say I've already learned something from this forum!
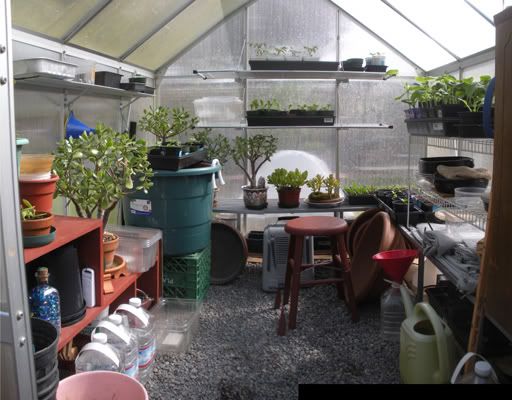
I purchased a small greenhouse from One Stop Gardens (via Harbor Freight) for $300 four years ago. This is one of the greenhouse kits I've noticed in the greenhouse advertsing bar at the bottom of some of the pages on this forum. This picture is from Spring/ Summer 2011. You can see my tomato and pepper starts on the sheves. I winter over some bonsai trees and jade plants as well as geraniums, begonias and Gerbera Daisies. In the winter, I use a small space heater (visible on ground in the picture) to keep the temp at 40F during the few cold weeks we experience here. So far it has worked pretty well. If overwintering pepper plants becomes a reality I'll be making more room in the greenhouse! I've started a thread in the Grow Tech forum to discuss issues which crop up with these units.
January 14, 2012:
Composting:
Okay, I need to do something outside. I know, I'll dig out a compost bin. We've had a little dry cool weather, so the worms have burrowed down, and the compost is crumbly, if a tad wet.
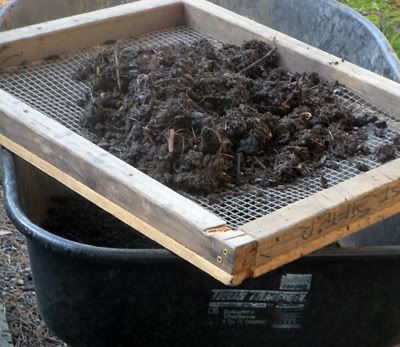
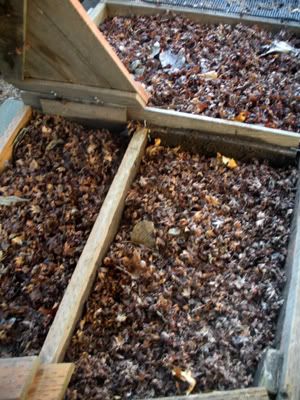
The first step - dig out the bin and sift the material. I use a homemade frame with a layer of 1/4 inch plastic hardware cloth backed with a layer of one inch mesh poultry netting. The fine stuff goes into the wheelbarrow, the coarse stuff into an adjacent compost bin we're still building up.
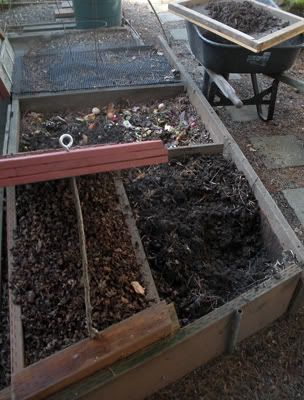
The bin on the left is covered to keep the leafy material dry and fluffy. The dry leaves are an important layer in the compost 'cake'. The bin on the right is the one I'm digging out. Nice, dark and crumbly with lots of worms! The sifter is on the wheelbarrow, and some of the coarse stuff is already on the active compost bin in the middle. The bin in the back is resting for several of months. It has a black plastic hardware cloth cover to keep out squirrels and racoons.
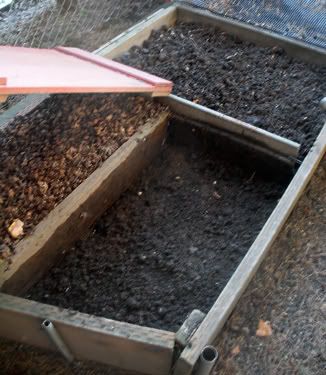
The bin is all dug out. I left about two inches of broken up compost on the bottom of the hole to create a space for the worms to move into. You can see the bin in the middle has a layer of coarse stuff spread out on the top.
The last step is to put a nice deep layer of dry leaves on the bin we just dug out. Now that bin will rest for a at least several months or more while the earthworms move into the compost/earth interface and do their work. That will make a great base for the next cycle of composting in this bin. I put a thin layer of leaves on the middle bin, too. Now there's a nice layer cake of dirt/compost, leaves. kitchen scraps. All small yard clippings except grass go into the compost bins, even tomato vines and pepper branches and twigs. I don't even chop stuff up too much. I try to have at least 10 or 12 layers of stuff built up before I cover the bin with a layer of dirt/compost and let the worms work for several months. I'm getting about 12-18 cubic feet of compost from these bins a year. My goal is to become 'soil self-sufficient' at some point, perhaps only having to procure horticultural pumice or vermiculite and some peat moss every so often.
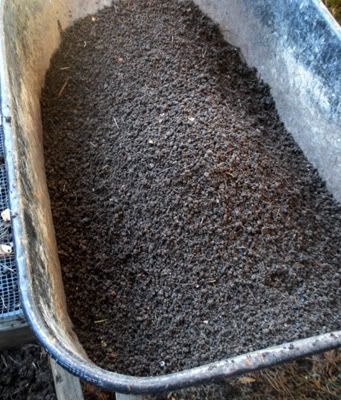
The good stuff. It will go into a plastic, vented storage bin for at lest eight weeks to cure a bit. Then I mix it with a little peat moss and some vermiculite or pumice for aeration. In my large containers, I add 2 or 3 inches of compost worked into the top of the container only every year. I try not to mix up the soil layers in the big containers very much, letting the nutrients percolate down through the soil as in a natural setting. As the blog continues this summer, I'll include photos of the irrigation system and containers I use to grow my tomatoes and peppers, and a few other things.
I've ordered seed from several sources which received at least a few good comments on this forum (6/12 - items crossed out did not germ, or weren't planted this year):
US Hot Stuff:
Bolivian Rainbow
Trinidad Scorpion (from Spankycolts)
The Hippy Seed Company: Seed Packet Mixes
NuMex Twilight (from Siliman)
Wild Texas Tepin
Refining Fire: Seed Packet Mix
Chocolate Habanero
New Mexico State University:
Chiltepin
Omnicolor
Red Carribean Habanero
Pepper Gal:
Aji Yellow (request from a Peruvian friend of ours!)
Peppermania:
Fatali
White Habanero (from Spanky)
Red Savina (cross with Fatali, from Spanky)
Bishop's Crown
Inca Red Drop
Orange Rocoto
Congo Trinidad
I doubt I will be able to try all of these out this year, but I have saved my seeds in small glass jars with tight-fitting lids for storage over the next year. I have been saving seed from other garden produce and have had good luck with germinating them after two or even three years. The jars are stored in boxes in the garage for a cool dark location for them. I have ordered several compact varieties with an eye toward trying to winter over some of my plants this year. Since I didn't even know peppers were perennial, I can say I've already learned something from this forum!
I purchased a small greenhouse from One Stop Gardens (via Harbor Freight) for $300 four years ago. This is one of the greenhouse kits I've noticed in the greenhouse advertsing bar at the bottom of some of the pages on this forum. This picture is from Spring/ Summer 2011. You can see my tomato and pepper starts on the sheves. I winter over some bonsai trees and jade plants as well as geraniums, begonias and Gerbera Daisies. In the winter, I use a small space heater (visible on ground in the picture) to keep the temp at 40F during the few cold weeks we experience here. So far it has worked pretty well. If overwintering pepper plants becomes a reality I'll be making more room in the greenhouse! I've started a thread in the Grow Tech forum to discuss issues which crop up with these units.
January 14, 2012:
Composting:
Okay, I need to do something outside. I know, I'll dig out a compost bin. We've had a little dry cool weather, so the worms have burrowed down, and the compost is crumbly, if a tad wet.
The first step - dig out the bin and sift the material. I use a homemade frame with a layer of 1/4 inch plastic hardware cloth backed with a layer of one inch mesh poultry netting. The fine stuff goes into the wheelbarrow, the coarse stuff into an adjacent compost bin we're still building up.
The bin on the left is covered to keep the leafy material dry and fluffy. The dry leaves are an important layer in the compost 'cake'. The bin on the right is the one I'm digging out. Nice, dark and crumbly with lots of worms! The sifter is on the wheelbarrow, and some of the coarse stuff is already on the active compost bin in the middle. The bin in the back is resting for several of months. It has a black plastic hardware cloth cover to keep out squirrels and racoons.
The bin is all dug out. I left about two inches of broken up compost on the bottom of the hole to create a space for the worms to move into. You can see the bin in the middle has a layer of coarse stuff spread out on the top.
The last step is to put a nice deep layer of dry leaves on the bin we just dug out. Now that bin will rest for a at least several months or more while the earthworms move into the compost/earth interface and do their work. That will make a great base for the next cycle of composting in this bin. I put a thin layer of leaves on the middle bin, too. Now there's a nice layer cake of dirt/compost, leaves. kitchen scraps. All small yard clippings except grass go into the compost bins, even tomato vines and pepper branches and twigs. I don't even chop stuff up too much. I try to have at least 10 or 12 layers of stuff built up before I cover the bin with a layer of dirt/compost and let the worms work for several months. I'm getting about 12-18 cubic feet of compost from these bins a year. My goal is to become 'soil self-sufficient' at some point, perhaps only having to procure horticultural pumice or vermiculite and some peat moss every so often.
The good stuff. It will go into a plastic, vented storage bin for at lest eight weeks to cure a bit. Then I mix it with a little peat moss and some vermiculite or pumice for aeration. In my large containers, I add 2 or 3 inches of compost worked into the top of the container only every year. I try not to mix up the soil layers in the big containers very much, letting the nutrients percolate down through the soil as in a natural setting. As the blog continues this summer, I'll include photos of the irrigation system and containers I use to grow my tomatoes and peppers, and a few other things.


 :
:


 I'm hoping to zero in on a few other folks' mad sci


