• Blog your pepper progress. The first image in your first post will be used to represent your Glog.

PaulG 2012

I'm chomping at the bit to get started with some new chilli varieties this coming Spring. So far I've just scratched the surface with Poblanos, Jalapenos and Serranos, all of which I really like. I've been egged on by a new Second Generation Mejicano neighbor as we've talked about hot chillis over the back fence! He helped me make some Pico de Gallo with my Serranos and Early Girl tomatoes and has some great recipes from his mother and grandmother. Hopefully I'll be able to share some of them on this forum in the future. I need to grow more Cilantro. Oh yeah!

I've ordered seed from several sources which received at least a few good comments on this forum (6/12 - items crossed out did not germ, or weren't planted this year):

US Hot Stuff:
Bolivian Rainbow
Yellow Peter
Nosegay
Trinidad Scorpion (from Spankycolts)
Devil Tongue

The Hippy Seed Company: Seed Packet Mixes
NuMex Twilight (from Siliman)
Yellow Jellybeans
Tom Thumbs
Wild Texas Tepin

Refining Fire: Seed Packet Mix
Scotch Bonnet
Chocolate Habanero
Jamaican Red Mushroom

New Mexico State University:
Chiltepin
Omnicolor
Red Carribean Habanero
Orange Habanero

Pepper Gal:
Aji Yellow (request from a Peruvian friend of ours!)
Thai Hot

Peppermania:
Inca Lost
Fatali
White Habanero (from Spanky)
Red Savina (cross with Fatali, from Spanky)
Bishop's Crown
Inca Red Drop
Orange Rocoto
Congo Trinidad

I doubt I will be able to try all of these out this year, but I have saved my seeds in small glass jars with tight-fitting lids for storage over the next year. I have been saving seed from other garden produce and have had good luck with germinating them after two or even three years. The jars are stored in boxes in the garage for a cool dark location for them. I have ordered several compact varieties with an eye toward trying to winter over some of my plants this year. Since I didn't even know peppers were perennial, I can say I've already learned something from this forum!


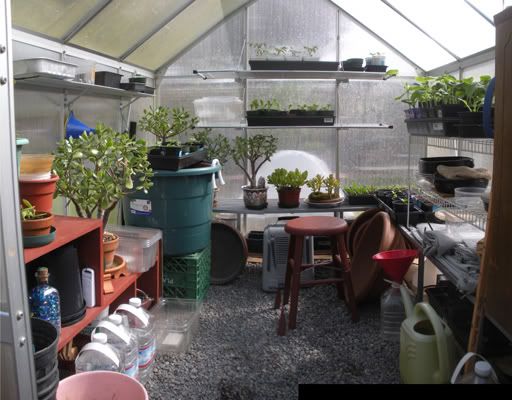
I purchased a small greenhouse from One Stop Gardens (via Harbor Freight) for $300 four years ago. This is one of the greenhouse kits I've noticed in the greenhouse advertsing bar at the bottom of some of the pages on this forum. This picture is from Spring/ Summer 2011. You can see my tomato and pepper starts on the sheves. I winter over some bonsai trees and jade plants as well as geraniums, begonias and Gerbera Daisies. In the winter, I use a small space heater (visible on ground in the picture) to keep the temp at 40F during the few cold weeks we experience here. So far it has worked pretty well. If overwintering pepper plants becomes a reality I'll be making more room in the greenhouse! I've started a thread in the Grow Tech forum to discuss issues which crop up with these units.
greenhousepan11a.jpg


January 14, 2012:

Composting:

Okay, I need to do something outside. I know, I'll dig out a compost bin. We've had a little dry cool weather, so the worms have burrowed down, and the compost is crumbly, if a tad wet.
DSCN3318sm.jpg


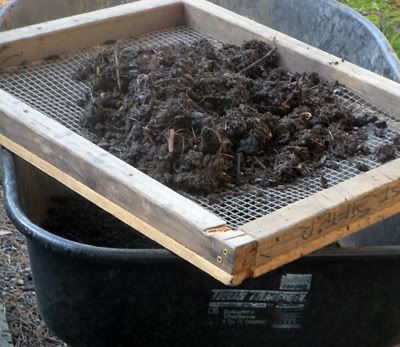
The first step - dig out the bin and sift the material. I use a homemade frame with a layer of 1/4 inch plastic hardware cloth backed with a layer of one inch mesh poultry netting. The fine stuff goes into the wheelbarrow, the coarse stuff into an adjacent compost bin we're still building up.
DSCN3316sm.jpg


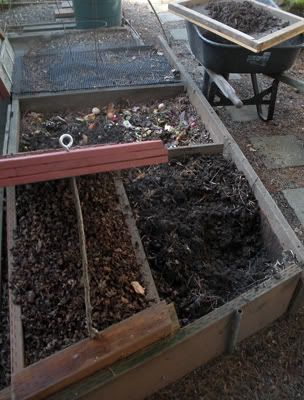
The bin on the left is covered to keep the leafy material dry and fluffy. The dry leaves are an important layer in the compost 'cake'. The bin on the right is the one I'm digging out. Nice, dark and crumbly with lots of worms! The sifter is on the wheelbarrow, and some of the coarse stuff is already on the active compost bin in the middle. The bin in the back is resting for several of months. It has a black plastic hardware cloth cover to keep out squirrels and racoons.
DSCN3321sm.jpg


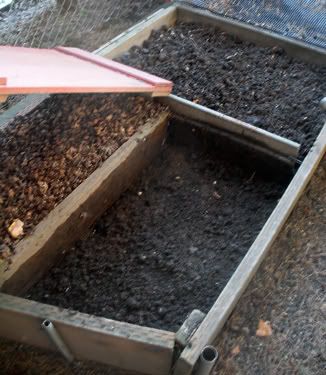
The bin is all dug out. I left about two inches of broken up compost on the bottom of the hole to create a space for the worms to move into. You can see the bin in the middle has a layer of coarse stuff spread out on the top.
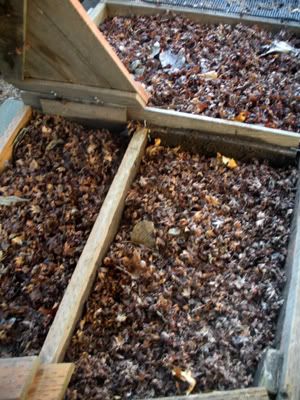
DSCN3323sm.jpg


The last step is to put a nice deep layer of dry leaves on the bin we just dug out. Now that bin will rest for a at least several months or more while the earthworms move into the compost/earth interface and do their work. That will make a great base for the next cycle of composting in this bin. I put a thin layer of leaves on the middle bin, too. Now there's a nice layer cake of dirt/compost, leaves. kitchen scraps. All small yard clippings except grass go into the compost bins, even tomato vines and pepper branches and twigs. I don't even chop stuff up too much. I try to have at least 10 or 12 layers of stuff built up before I cover the bin with a layer of dirt/compost and let the worms work for several months. I'm getting about 12-18 cubic feet of compost from these bins a year. My goal is to become 'soil self-sufficient' at some point, perhaps only having to procure horticultural pumice or vermiculite and some peat moss every so often.
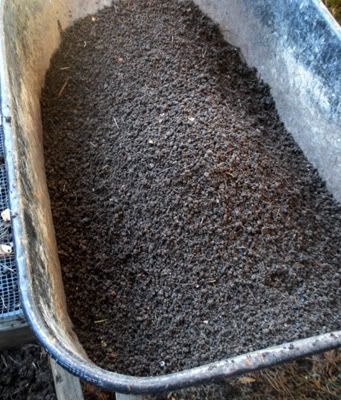
DSCN3322sm.jpg


The good stuff. It will go into a plastic, vented storage bin for at lest eight weeks to cure a bit. Then I mix it with a little peat moss and some vermiculite or pumice for aeration. In my large containers, I add 2 or 3 inches of compost worked into the top of the container only every year. I try not to mix up the soil layers in the big containers very much, letting the nutrients percolate down through the soil as in a natural setting. As the blog continues this summer, I'll include photos of the irrigation system and containers I use to grow my tomatoes and peppers, and a few other things.
 
Hi Paul
Lookin' good as usual. How many of your babies have you moved out into your greenhouse? Any idea yet when you'll be able to plant outside? I'm itching to get my hands in the dirt too!
 
Hi Paul
Lookin' good as usual. How many of your babies have you moved out into your greenhouse? Any idea yet when you'll be able to plant outside? I'm itching to get my hands in the dirt too!

Hey, Rick, thanks for looking. I have four plants out there now - kind of a test for a week or so to see how they fare. I imagine they will slow down growth since they won't be in their toasty little cocoons. i'm going to start potting up to 1 gallons in the next couple of days - annuums and baccatums. I'll wait on the chinense since they aren't so tall. I'm thinking another month to six weeks 'til planting outside in the containers. I'll get a little fingers-in-the-dirt fix when I mix up my potting soil. How does 1/3 compost, 1/3 peat moss, and 1/3 perlite sound to you?

Good luck getting your Spring planting underway!
 
Hey Paul.

Let me just say that I LOVE your cloning experiment!
Also learned a lot from others posting in this thread.
Great Glog, keep up the good work!
 
How does 1/3 compost, 1/3 peat moss, and 1/3 perlite sound to you?

That's what Mel Bartholomew recommends in his books about square foot gardening. He says it doesn't matter whether you use vermiculite or perlite, but use the coarse stuff since the idea is to open up the soil and let in air and to hold onto water, and the fine to medium doesn't work as well. .I've been square foot gardening for about fifteen years and love the results for intensive gardening in a small space.
 
Aji Seed Germination test update:

Another hook in the dirt germination test tray for a total of 3/9 so far there.
In the cup germinated tray, four sprouts and a hook out of 8 so far:
DSCN4040a.jpg


It has been two weeks since the clones were transplanted into their solo cups.
Thought it might be a good time for a before and after two week review. I put
these in the cups on 3/17, and let the cups soak up water in a tray. I weighed
a cup of planting mix and have been monitoring the cup weights. (Dry weight
about 255gr for the 18-ounce cups.) So far I have not added water to them,
and only a few are within 25gr of that weight.

I'm a little amazed by that - anyone else with similar data?

Here are the before and after shots. An ® means showing roots out
bottom of cup.

Group 1, 3/17:
DSCN3909a.jpg

Back: Omni Color ®
Middle: Inca Red Drop, Inca Red Drop
Front: Black Pearl, Chiltepin ®, Bolivian Rainbow ®

Group 1, 3/31:
DSCN4035a.jpg

The Bolivian Rainbow got too much light early on and became very dark purple. It has
taken a while to get going again, but at least it is putting out green new growth. The Inca
Red Drops have probably grown the fastest of all.

Group 2, 3/17:
DSCN3910a.jpg

Back: Fatali
Middle: Fatali, Bishop's Crown
Front: Wild texas Tepin, Yellow Aji (stem segment), Bishop's Crown

Group 2, 3/31:
DSCN4036a.jpg

In this group, the Bishop's Crown's have been kind of sickly and slow growing from
the beginning. They have perked up considerably in the last few days. I'm not sure
why, maybe they just don't clone well in the same way they don't branch well if
pinched up high, like a serrano might.

Group 3, 3/17:
DSCN3911a.jpg

Back: Chocolate Habanero ®
Middle: Bolivian Rainbow (really hard to see so dark), Congo Trinidad ®
Front: Red Caribbean, Red Caribbean

Group 3, 3/31:
DSCN4037a.jpg

This Bolivian Rainbow is in the same boat as the other. The chinense
plants seem to have responded well to the process; overall looking
pretty healthy.

Thanks, everybody for visiting! Gallon pots coming soon!
Hope your own grow is going great guns!

Hey Paul.

Let me just say that I LOVE your cloning experiment!
Also learned a lot from others posting in this thread.
Great Glog, keep up the good work!

Thanks, Corey, glad you are enjoying the shenanigans here!
You are right about the great posts by others in this thread.
It has always been the best part! Good luck growing your own
pepper crop!


Holy moley Paul! The plants are looking great! Are you cutting the terminal off all of them?

Hey, Red! Thanks for stopping in. I only kept about 4 or 5 of the duplicate plant donor stems
I pinched. They were all 'runts' - the second sprout in a cell. So, I just used them as an
experiment never having cloned peppers before. All the other branching annuums and
baccatums have forked on their own. Some are into their fourth bifurcation.

I do think that pinching the terminals is going to become an SOP for my annuums. The Cayennes
and Serranos respond especially well to the treatment since they back bud readily. The others
I tried which I pinched at the first node avoided having a gangly stem with two leaders Like the
Bishop's Crown.

I have not tried this with chinense varieties, yet. Don't see a real need, they grow so squat, anyway

Good growin', buddy!

That's what Mel Bartholomew recommends in his books about square foot gardening. He says it doesn't matter whether you use vermiculite or perlite, but use the coarse stuff since the idea is to open up the soil and let in air and to hold onto water, and the fine to medium doesn't work as well. .I've been square foot gardening for about fifteen years and love the results for intensive gardening in a small space.

Thanks, I guess that's a pretty good recommendation!
I have also used horticultural pumice, have you ever tried that?
Can get in bulk at the local landscape supply.
 
That's high praise from a 'pepper whisperer', Patrick :D Thank you much.
It may look like walking; often it feels like lurching and stumbling :doh:
Somehow mother nature is forgiving and bails me out. A lot!

My Kansas farmer ancestors would like your work, as well, as do I!
Have a great weekend with your peppers!
 
Paul or should I say Scoville SKipper lol just stopped by to catch up on your grow.Tell me how many peppers do you have going?Seems like everytime I stop by you got new pics.You sitting on top of two or three huge greenhouses? What did you think of the Black Gold soil conditioner?I use Black Gold soil from time to time and actually think it's good soil for the price.What do you normally use? I saw some of your solo cups had what appeared to be bark pieces. Anyways old friend fasinating stuff I'll be back.
 
Looking good man!

I tried to read the whole thread, but had to tap out at page 16 and jump to the end. You should have a ridiculous bounty of peppers this summer & fall.
 
Aji seed germination test update:

Took a quick look in the 'chamber of horrors' a few minutes ago. Looks like
3 more hooks in the dirt germination test tray (sown on 3/22) for a total of 6/9
at 9 days. As these germinate, I'm cutting their cell out and putting it under
lights in a holder (an empty cell tray.) I forgot whose idea this is, but thanks,
it really solves a lot of problems! It has forced me to view those little 3x3 cell
trays as consumables. I've used some of them for three seasons! :scared: :oops:
I have to get a grip on myself. I'm repairing them with celo tape for cryin' out loud!

In the cup germinated (placed in cups on 3/14, peroxide soak on 3/22) seed tray,
2 more hooks poking up through soil, so 7/8 for those at 17 days. Only my second
try at cup germination, so had a little mold issue, and I let it get a bit dry and warm,
so a better technique might have yielded faster results.

I'll have some pix up tomorrow.

Gave the clone cup transplants a couple of ounces of water to bring them to about
70-80 grams over dry weight. We'll see how long a couple of ounces of water lasts.
So, thanks to whoever had the idea of weighing the cups and watering on that basis.
Without that information, I'm sure I would have over-watered. I still can't believe that
the soaked cups lasted 14days.

Can't say as I have, but I think you're closer to the source...

Yes, we have a u-haul landscape supply about 4 miles from our house!
Pretty handy!

Paul or should I say Scoville SKipper lol just stopped by to catch up on your grow.Tell me how many peppers do you have going?Seems like everytime I stop by you got new pics.You sitting on top of two or three huge greenhouses? What did you think of the Black Gold soil conditioner?I use Black Gold soil from time to time and actually think it's good soil for the price.What do you normally use? I saw some of your solo cups had what appeared to be bark pieces. Anyways old friend fasinating stuff I'll be back.

Haha SS. I don't have that many going - I think in round numbers like 45 plants and 18 clones. I'll keep around 25-30, I suppose. I just keep taking pictures of the same plants :D I haven't used the soil conditioner before. When it warms up I'll work some into my big containers and beds as an experiment. The soil in my solo cups is a little more than 1/3 compost, a little less than 1/3 each peat moss and perlite. I think I'll be putting gallon pots up in a few days.

Thanks for stopping by, Robin! Have a nice Sunday; hope your pepper project is hummin'! I need to visit your grow log!


Looking good man!

I tried to read the whole thread, but had to tap out at page 16 and jump to the end. You should have a ridiculous bounty of peppers this summer & fall.

I probably would have bailed out a lot earlier :lol: but thanks for sticking
with it that far! I'm hoping for around 25-30 at most, with maybe 22 varieties.
If each plant gives me a pod, that will be maybe two dozen pods :party:

Thanks for the vote of confidence MAFWIZ - good luck with your own grow!
 
Aji Seed Germination test update:

Another hook in the dirt germination test tray for a total of 3/9 so far there.
In the cup germinated tray, four sprouts and a hook out of 8 so far:
DSCN4040a.jpg


It has been two weeks since the clones were transplanted into their solo cups.
Thought it might be a good time for a before and after two week review. I put
these in the cups on 3/17, and let the cups soak up water in a tray. I weighed
a cup of planting mix and have been monitoring the cup weights. (Dry weight
about 255gr for the 18-ounce cups.) So far I have not added water to them,
and only a few are within 25gr of that weight.

I'm a little amazed by that - anyone else with similar data?

Here are the before and after shots. An ® means showing roots out
bottom of cup.

Group 1, 3/17:
DSCN3909a.jpg

Back: Omni Color ®
Middle: Inca Red Drop, Inca Red Drop
Front: Black Pearl, Chiltepin ®, Bolivian Rainbow ®

Group 1, 3/31:
DSCN4035a.jpg

The Bolivian Rainbow got too much light early on and became very dark purple. It has
taken a while to get going again, but at least it is putting out green new growth. The Inca
Red Drops have probably grown the fastest of all.

Group 2, 3/17:
DSCN3910a.jpg

Back: Fatali
Middle: Fatali, Bishop's Crown
Front: Wild texas Tepin, Yellow Aji (stem segment), Bishop's Crown

Group 2, 3/31:
DSCN4036a.jpg

In this group, the Bishop's Crown's have been kind of sickly and slow growing from
the beginning. They have perked up considerably in the last few days. I'm not sure
why, maybe they just don't clone well in the same way they don't branch well if
pinched up high, like a serrano might.

Group 3, 3/17:
DSCN3911a.jpg

Back: Chocolate Habanero ®
Middle: Bolivian Rainbow (really hard to see so dark), Congo Trinidad ®
Front: Red Caribbean, Red Caribbean

Group 3, 3/31:
DSCN4037a.jpg

This Bolivian Rainbow is in the same boat as the other. The chinense
plants seem to have responded well to the process; overall looking
pretty healthy.

Thanks, everybody for visiting! Gallon pots coming soon!
Hope your own grow is going great guns!


Thanks, Corey, glad you are enjoying the shenanigans here!
You are right about the great posts by others in this thread.
It has always been the best part! Good luck growing your own
pepper crop!


Hey, Red! Thanks for stopping in. I only kept about 4 or 5 of the duplicate plant donor stems
I pinched. They were all 'runts' - the second sprout in a cell. So, I just used them as an
experiment never having cloned peppers before. All the other branching annuums and
baccatums have forked on their own. Some are into their fourth bifurcation.

I do think that pinching the terminals is going to become an SOP for my annuums. The Cayennes
and Serranos respond especially well to the treatment since they back bud readily. The others
I tried which I pinched at the first node avoided having a gangly stem with two leaders Like the
Bishop's Crown.

I have not tried this with chinense varieties, yet. Don't see a real need, they grow so squat, anyway

Good growin', buddy!


Thanks, I guess that's a pretty good recommendation!
I have also used horticultural pumice, have you ever tried that?
Can get in bulk at the local landscape supply.
photo 6: it seems you've got a stealth plant ;)
 
Hi PaulG,

Great looking plants. From you pictures, your soil looks relatively dry. I recently potting my plants in solo cups (one week ago) and have not watered since. My soil still looks damp. I am holding off watering until the soil looks dry on top and the cups are lighter in weight. How often do you water?
.
Yeah, looking good there Paul! I'd be interested to know how often you water too, as i think i'm still being a bit heavy handed with the water here!
 
photo 6: it seems you've got a stealth plant ;)

Haha Stealth plant. Yeah, the little Bolivian Rainbows got heat purpled
pretty bad when they were cloned. Has taken a long time for little green
leaves to start appearing at the terminal. So, it's almost impossible to see
in the before pic! Thanks for taking a look, Marino!


Hi PaulG,

Great looking plants. From you pictures, your soil looks relatively dry. I recently potting my plants in solo cups (one week ago) and have not watered since. My soil still looks damp. I am holding off watering until the soil looks dry on top and the cups are lighter in weight. How often do you water?
Yeah, looking good there Paul! I'd be interested to know how often you water too, as i think i'm still being a bit heavy handed with the water here!

When I soaked the cups in a tray of water and let them get pretty moist, it lasted two weeks. I just watered for the first time yesterday. I poured a couple of ounces into each bottom cup and the top cups soaked it up in less than a minute! I just used two ounces as kind of a test. I have been weighing the cups daily, but want to get a better handle on just how much water they go through. I like to keep the top of the soil dry - I have a little cultivator tool I use to keep the top loose so air and water vapor can move freely in and out of the soil, and discourage fungus gnats.

Whoever had the idea of weighing cups was a genius! It's sort of a hassle at first, but the best way to really gauge water use. I'm sure I would have drowned the plants if i had to water by guess and check.

Thanks for looking in, Nee. Good luck with those new transplants, Fizz!
 
Back
Top