• Blog your pepper progress. The first image in your first post will be used to represent your Glog.

PaulG 2012

I'm chomping at the bit to get started with some new chilli varieties this coming Spring. So far I've just scratched the surface with Poblanos, Jalapenos and Serranos, all of which I really like. I've been egged on by a new Second Generation Mejicano neighbor as we've talked about hot chillis over the back fence! He helped me make some Pico de Gallo with my Serranos and Early Girl tomatoes and has some great recipes from his mother and grandmother. Hopefully I'll be able to share some of them on this forum in the future. I need to grow more Cilantro. Oh yeah!

I've ordered seed from several sources which received at least a few good comments on this forum (6/12 - items crossed out did not germ, or weren't planted this year):

US Hot Stuff:
Bolivian Rainbow
Yellow Peter
Nosegay
Trinidad Scorpion (from Spankycolts)
Devil Tongue

The Hippy Seed Company: Seed Packet Mixes
NuMex Twilight (from Siliman)
Yellow Jellybeans
Tom Thumbs
Wild Texas Tepin

Refining Fire: Seed Packet Mix
Scotch Bonnet
Chocolate Habanero
Jamaican Red Mushroom

New Mexico State University:
Chiltepin
Omnicolor
Red Carribean Habanero
Orange Habanero

Pepper Gal:
Aji Yellow (request from a Peruvian friend of ours!)
Thai Hot

Peppermania:
Inca Lost
Fatali
White Habanero (from Spanky)
Red Savina (cross with Fatali, from Spanky)
Bishop's Crown
Inca Red Drop
Orange Rocoto
Congo Trinidad

I doubt I will be able to try all of these out this year, but I have saved my seeds in small glass jars with tight-fitting lids for storage over the next year. I have been saving seed from other garden produce and have had good luck with germinating them after two or even three years. The jars are stored in boxes in the garage for a cool dark location for them. I have ordered several compact varieties with an eye toward trying to winter over some of my plants this year. Since I didn't even know peppers were perennial, I can say I've already learned something from this forum!


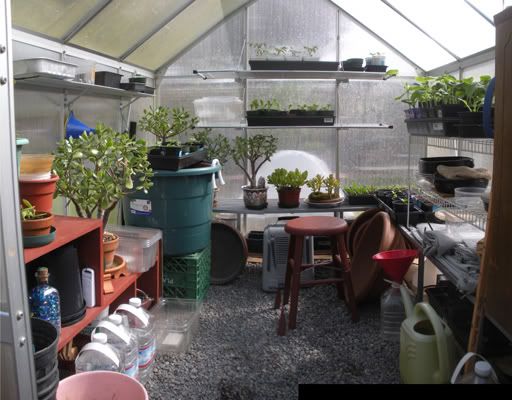
I purchased a small greenhouse from One Stop Gardens (via Harbor Freight) for $300 four years ago. This is one of the greenhouse kits I've noticed in the greenhouse advertsing bar at the bottom of some of the pages on this forum. This picture is from Spring/ Summer 2011. You can see my tomato and pepper starts on the sheves. I winter over some bonsai trees and jade plants as well as geraniums, begonias and Gerbera Daisies. In the winter, I use a small space heater (visible on ground in the picture) to keep the temp at 40F during the few cold weeks we experience here. So far it has worked pretty well. If overwintering pepper plants becomes a reality I'll be making more room in the greenhouse! I've started a thread in the Grow Tech forum to discuss issues which crop up with these units.
greenhousepan11a.jpg


January 14, 2012:

Composting:

Okay, I need to do something outside. I know, I'll dig out a compost bin. We've had a little dry cool weather, so the worms have burrowed down, and the compost is crumbly, if a tad wet.
DSCN3318sm.jpg


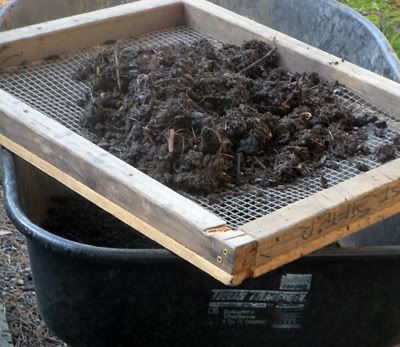
The first step - dig out the bin and sift the material. I use a homemade frame with a layer of 1/4 inch plastic hardware cloth backed with a layer of one inch mesh poultry netting. The fine stuff goes into the wheelbarrow, the coarse stuff into an adjacent compost bin we're still building up.
DSCN3316sm.jpg


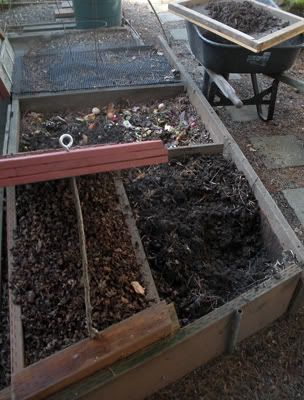
The bin on the left is covered to keep the leafy material dry and fluffy. The dry leaves are an important layer in the compost 'cake'. The bin on the right is the one I'm digging out. Nice, dark and crumbly with lots of worms! The sifter is on the wheelbarrow, and some of the coarse stuff is already on the active compost bin in the middle. The bin in the back is resting for several of months. It has a black plastic hardware cloth cover to keep out squirrels and racoons.
DSCN3321sm.jpg


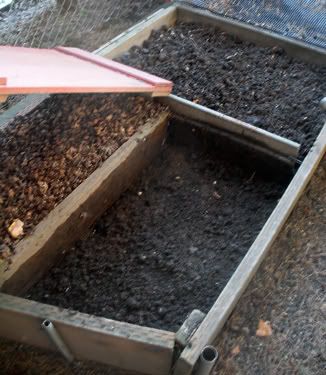
The bin is all dug out. I left about two inches of broken up compost on the bottom of the hole to create a space for the worms to move into. You can see the bin in the middle has a layer of coarse stuff spread out on the top.
DSCN3323sm.jpg


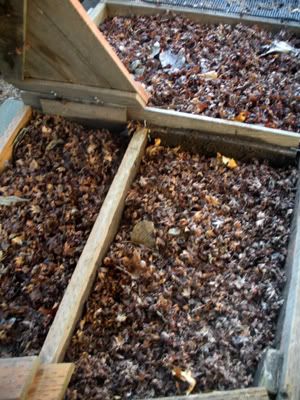
The last step is to put a nice deep layer of dry leaves on the bin we just dug out. Now that bin will rest for a at least several months or more while the earthworms move into the compost/earth interface and do their work. That will make a great base for the next cycle of composting in this bin. I put a thin layer of leaves on the middle bin, too. Now there's a nice layer cake of dirt/compost, leaves. kitchen scraps. All small yard clippings except grass go into the compost bins, even tomato vines and pepper branches and twigs. I don't even chop stuff up too much. I try to have at least 10 or 12 layers of stuff built up before I cover the bin with a layer of dirt/compost and let the worms work for several months. I'm getting about 12-18 cubic feet of compost from these bins a year. My goal is to become 'soil self-sufficient' at some point, perhaps only having to procure horticultural pumice or vermiculite and some peat moss every so often.
DSCN3322sm.jpg


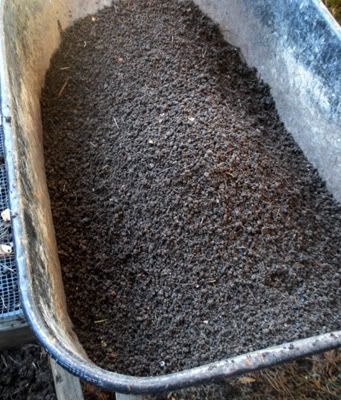
The good stuff. It will go into a plastic, vented storage bin for at lest eight weeks to cure a bit. Then I mix it with a little peat moss and some vermiculite or pumice for aeration. In my large containers, I add 2 or 3 inches of compost worked into the top of the container only every year. I try not to mix up the soil layers in the big containers very much, letting the nutrients percolate down through the soil as in a natural setting. As the blog continues this summer, I'll include photos of the irrigation system and containers I use to grow my tomatoes and peppers, and a few other things.
 
Seedlings getting leggy and hitting top of domes, so time to pot up.
I usually like to have more root ball, but some cells had roots peeking
out the bottom of the cells. There were enough roots in the cells to
hold the soil if I was careful. Since I was jumping the gun a little, a
couple of seedlings got kind of shocky, so I sprayed a little B-1 on their
cells. We'll see what's up in the morning.

DSCN3458a.jpg

Potting soil: recycled potting soil, compost, peat and vermiculite. Lots of organic matter as
well as dirt, worm castings, and even some worms!


DSCN3463a.jpg

Hole for plug in the new pot.


DSCN3464a.jpg

Root plug with the little wire tool I made for lifting the root ball
out of the cell, ready to go in the hole. I transplanted 10 cells
tonight, day 10. I'll snip off weaker seedlings after they have
time to get established in the new pots. I'm hoping for two good
plants of each variety, so I'll have a few to trade or give away.
Some may only have one good plant due to poor germinating in the
orchid mix.
 
Make sure to plant the seedlings deep enough so only the leaves are showing, at least for the 1st round of transplants. I add alittle soil to the bottom of the pot set the plug in then build around it. You are using a fan ?

Greg
 
2/2 - seeds germinated (showing cotyledons) 11th day:

Orchid Mix:

2x wild texas tepin - THC

Soil Mix:

1x wild texas tepin - THC

Total so far 60

I needed more light to go with the bigger space taken up by the new transplants.
Now there are 4x 4' GE F 40 Full Spectrum flourescent tubes. Bonus: I get my bench top
back! The temp stays at 80F when I leave it alone. I poured some water in the trays so
the new pots could soak up some water. The B-1 I sprayed in the shock-y cells brought
the seedlings right back, so I sprayed a little into each hole before I put the rest of the plugs
in today. The orchid mix held together really well to make great root balls. The soil mix,
being a little heavier usually left a little dirt in the bottom of the cell. I am always amazed
at how many roots a little seedling can have.

DSCN3465a.jpg

2/2 @11:30p: The temperature was at 83.7F after a couple of hours being
closed up. Still working on a fan idea.
DSCN3468a.jpg


Here are the new transplants - still about 7 cells left to go:
DSCN3470a.jpg


DSCN3471a.jpg


DSCN3472a.jpg


DSCN3473a.jpg
 
Make sure to plant the seedlings deep enough so only the leaves are showing, at least for the 1st round of transplants. I add alittle soil to the bottom of the pot set the plug in then build around it. You are using a fan ?

Greg

Right on, Greg. I try to get them as deep as possible. Sometimes one is too tall. I'm not sure how to fit a
fan in, there's no room on the table. Maybe a little hole in one of the end panels with some small,
lightweight fan I could attach to the panel. I hope it wouldn't blow the foil around. Ah, the pleasures
of Ghetto Growing I'll look for a fan tomorrow. Thanks for checking in!

They look great so the soil outperformed the orchid mix what was is the current germination rate for the soil vs orchid mix overall.
Thanks for asking, Fernando. Here's my summary so far. It's a really small sample,
so don't know how applicable it is to other folks' situations. The soil mix seems to have
outperformed the orchid mix, although a few varieties did well in either or both.
(2/5: New germinating seeds have changed this - they are almost equal, now.)
(2/6: Orchid mix now outperforming soil mix in the extended time frame!)

Party guys = 80% or better:

name of pepper.....................# in orchid mix....................# in soil mix..........total
yellow aji PG.................................1/3...................................1/3....................2/6
chocolate habanero RF................1/3...................................1/3....................2/6
bolivian rainbow USHot................3/3....................................2/3....................5/6 :party:
serrano Hume...............................2/3...................................3/3 ...................5/6 :party:
fatali PM........................................3/3...................................2/3....................5/6 :party:
congo trinidad PM........................1/3...................................3/3 ....................4/6
red caribean NMSU.....................1/3....................................3/3 ...................5/6 :party:
chiltepin NMSU.............................0/3...................................2/3....................2/6
long red cayenne Ferry Morse.....3/3 ..................................1/3....................4/6
poblano Hume..............................1/3...................................2/3....................3/6
inca red drop PM..........................3/3 ..................................2/3....................5/6 :party:
omnicolor NMSU...........................2/2 ................................2/3.....................4/5 :party:
bishop's crown PM.......................2/2 .................................2/3....................4/5 :party:
marconi rosso Hume....................1/3...................................3/3 ...................4/6
early jalapeno Hume.....................3/3 .................................3/3 ...................6/6 :party:
orange rocoto PM.........................1/2...................................0/2...................1/4
white habanero.............................1/3...................................0/3...................1/6

totals.......................................30/48 (62.5%).................32/50 (64%).......62/98 (63.3%)*
* underlined brown numbers are updates

There may be some late germinators in the transplanted cells yes? I also have not
tabulated the ornamentals or white habs yet, will update with their data in a week or so, depending.
(2/4 - I will make a separate table for he ornamentals.)
Results may be inconclusive, as some varieties did just as well or better in the orchid mix, and some
in the soil/peat mix. The orchid mix germination rate was about 97.6% that of the soil mix over all.
It also seems the sifted orchid mix works pretty well for some things. You can draw your own
conclusions from this tiny sample.
 
...Seedlings getting leggy and hitting top of domes, so time to pot up.
I usually like to have more root ball, but some cells had roots peeking
out the bottom of the cells...

Hmmm, seems way too early to pot up. IMO, lose the dome when most of the plants in the group have sprouted. Normally, transplant when they get some true leaves. But it looks like you solved the problem of them being leggy by the early pot up.

On the plus side, your germination rate is excellent, totally kicked my butt. And your pot up mix sounds and looks fantastic. Those fellas are going to love their new homes. They won't be looking back.... :cool:

I'm with you, I really wanted to wait awhile. On the other hand, hopefully, the roots
are going to have uninterrupted growth until they fill these pots. With these lights, we
are still going to reach. I don't want to get too close. The temp when I leave it alone is 80,
so I need to keep an eye on the water, too. (Later: 83.7)
Some of the seeds had great germination rates, others not so great : )
Thanks for the good energy, I'm sure they can feel it!. How's the weather in Boise?
 
It will be interesting to see which can form a better rootball, so if you could, grab a couple of shots before you pot up.

Okay Sman- There was a pic of the soil mix root plug in the photos above. Here's a pic of
one of the orchid mix root plugs. It hangs together great:
DSCN3475a.jpg


Dropped into a hole in the potting soil:
DSCN3476a.jpg


And topped off to be nice and cozy:
DSCN3478a.jpg

I hope this gave you what you wanted too see. The orchid mix plugs were really easy to work with.
They pushed out of the cells quite easily, and dropped into the hole in the potting mix just right.
Then very easy to push down gently and fill in the top of the pot with soil mix.
 
Dude! Are you sure there are some roots in there? You've gotta let the roots fill up that space--should be little white roots forming a ball starting to push the edges of the cell. Give me a couple minutes, I'll go pluck one and see what I got for root ball...doin best I can late night gardening!

Up top I have plants about 1.5-inches tall, they do have 2 sets of true leaves:

2012%2520start%2520212%2520006.jpg


Down below, I thought I'd see a better root ball-- but it looks like I can wait another week or so before worrying about potting up:
2012%2520garden3.jpg


The cell is only about 20% filled with roots, so I'll be waitin. My trash talkin didn't help, I guess! Thanks for making me check one, I was kinda wondering what was going on. Now I better go pot this poor Datil up! G'Night.... :cool:
 
Good point Sil,

My root system comes out of the insert looking like a "cocoon"..........sometimes part of the roots make there way throw the drain holes. I like to take a sample peek at one plant before I yank them out. And "moist" is the word when doing so . It's too easy to damage the seeling when the root balls dry.

The only time I take any out that early is with my tomato seedlings. It makes them easy to seperate when they're small. With tomato seeds I never make an effort of only planting one seed per cell.........especially with the pea size " champagne" tomatoes.

Greg
 
Thanks for the feedback, guys. I guess I'm performing another experiment
w/o knowing it! We'll see what happens : )
A number of cells had roots sticking out the bottom of the drain holes,
and I could see root tips poking out the sides of the plug on a number
of them. I guess that's what prompted me to act. I wonder in the long run
how much difference it will make? I have no control for this test, so will
not have a comparison, just a result, if that makes sense. Meanwhile, I get
vicarious thrills from following your exemplary grow logs :cool:

Now off to find a little fan.
 
I have transplanted alot of sprouts early from the tupperware that sits on my heatmat and they have just came out fine just be careful with the roots not to damage them otherwise it will be under critical emergency some make it and other don't. Great results and information hopefully you get 100% germination soon.
 
Yea, there's a lot variables and ways to do business. Some of the big growers do mass plantings in undivided trays then seperate them to pot up at the small cotyledon stage. Some cut them with a knife, others rinse the roots gently and then separate. Just shows how tough the peppers really are at almost any stage. That Datil I messed with for the photo will do just fine: went into a 2.5 x 3.5 tall pot with Pro Mix BX. I gave the roots a haircut since it was all dangly. Done it before, grows fine.

PaulG, those babies will be loving it in your secret weapon: great grow mix. You are really going to shine at each pot up with that stuff. I'm constantly struggling with improving soil, and this year going to more containers. You've got a lot of great info here how to achieve it.

Hey, is your wire 'lifting tool' just a horseshoe shape? Your cells came out nice and tidy. Mine pretty much disintegrated being freshly watered and no good root ball to hold the shape. I was glad to check one though. I may increase my lighting hours as I think I'm growing pretty slowly. Temps in the grow room another factor--gets to 60F at night when lights are off.

Thanks again for your detailed G-Log--one of the best around.... :cool:
 
I have transplanted alot of sprouts early from the tupperware that sits on my heatmat and they have just came out fine just be careful with the roots not to damage them otherwise it will be under critical emergency some make it and other don't. Great results and information hopefully you get 100% germination soon.

Glad to hear I might not have killed them :banghead: I think spraying a tiny bit of B-1 into
the hole might have been a good idea. Never have done that before, but I think
I will make it a part of my transplanting routine. I couldn't believe how fast
the shock-y seedlings recovered with it. Thanks for following along, Fernando.
 
Yea, there's a lot variables and ways to do business. Some of the big growers do mass plantings in undivided trays then seperate them to pot up at the small cotyledon stage. Some cut them with a knife, others rinse the roots gently and then separate. Just shows how tough the peppers really are at almost any stage. That Datil I messed with for the photo will do just fine: went into a 2.5 x 3.5 tall pot with Pro Mix BX. I gave the roots a haircut since it was all dangly. Done it before, grows fine.

PaulG, those babies will be loving it in your secret weapon: great grow mix. You are really going to shine at each pot up with that stuff. I'm constantly struggling with improving soil, and this year going to more containers. You've got a lot of great info here how to achieve it.

Hey, is your wire 'lifting tool' just a horseshoe shape? Your cells came out nice and tidy. Mine pretty much disintegrated being freshly watered and no good root ball to hold the shape. I was glad to check one though. I may increase my lighting hours as I think I'm growing pretty slowly. Temps in the grow room another factor--gets to 60F at night when lights are off.

Thanks again for your detailed G-Log--one of the best around.... :cool:

You are so right. I have cut root balls in half with a sharp knife, dusted them with a little Rootone, and off they go! In playing around with bonsai type plantings, I have become aware of just how tough plants are. I recently (Dec.) repotted about a 12 year old 3' tall black pine and removed about 97% of its roots. It is pushing out new candles as we speak! What doesn't kill makes stronger! I'll bet your little datil doesn't even know its been transplanted!

Getting the soil thing down is where it's at for sure. I like using the containers a lot. Limits space to grow (I'd love to have some nice big raised beds!), but one gains a huge amount of control - both of mix and pests. My own theory is that by mixing recycled soil/compost from a variety of plants, there is a wide spectrum of nutrients present in the mix. I have never measured pH or any of that stuff. Maybe that's something I should do. My only downfall now is when I start a new large container and need to fill it up with soil - pretty much wipes me out. So I break down and get a quarter or half yard of a basic mix to augment my supply. Someday...

You know, I was thinking that I should have included a pic of the wire tool, but didn't. Now that you've called my bluff, here is a pic of my transplanting kit. I liked the suggestions others have made about how to remove root plugs, as well. One problem with my tool is that it's easy to poke it right through the flimsy plastic cells, so it took me a few tries to be able to use it w/o destroying my stuff! Before I was pushing up hard on the bottom, and scrunching up the cells. This makes it easier.

DSCN3479a.jpg


Thanks for the kind words, Sman. I basically am stealing ideas from everyone else! I really like the collaborative atmosphere in this forum - everyone willing to share ideas with whoever needs something. You guys are gems!


Yea when transplanting I use some mycorrhizae to help through the pot up stages with my plants.

Have never tried that, Fernando. What does it look like?

2/3 - seeds germinating (showing hooks) 12th day:

Orchid Mix:

1x poblano - Hume Seeds

Soil Mix:

1x black pearl - THC

Total so far 62
 
Different companies have different versions the oregonismxl from root organics I am currently finishing off the free sample is black fine powder and xtreme gardening has mykos some that look like fine brown powder. I think you wouldn't need it since your using your own compost so you have good bacteria roaming about your soil to help feed your root system. I use it because I don't use compost with my mixture just peatmoss and reused soil from last year, so my plants need all the help they can get to intake all the good system from my feeding cycle. I never thought about pruning baby sprouts does it improve growth or is it more for introducing the plant into a new soil.My old transplanting technic was using tweezers so I had a habit of sometimes pressing to hard and cutting the main root stem from stem, so I try now to take a chuck off the dirt when when transplanting.
 
Once again, lookin good paul! just goes to show that you don't need all the technical grow stuff to get some seedlings poppin. Good germ rates, I was wondering about the orchid mix, glad to see that it was as I suspected. Good.. but not the best. Dude.. just like you most of my techniques are stolen from people from THP and you just made me add another to my list.. The Wire Tool. That things money! After potting up 208 plants with my fingers.. I couldn't be happier to find your idea! I'll be doing that next year :)

Glad your looking for a fan, not only will it bring down your temps but more importantly it will get your plants ready for the outdoors and the weather that awaits them. Just like others have said, I appreciate the detailed glog. I've been trying to do the same :)
 
I never thought about pruning baby sprouts does it improve growth or is it more for introducing the plant into a new soil. My old transplanting technic was using tweezers so I had a habit of sometimes pressing to hard and cutting the main root stem from stem, so I try now to take a chuck off the dirt when when transplanting.
I have read that it is best not to grab a seedling by the stems. One person said to grasp by the leaves very gently if you have to touch the plant at all. I try to get as much dirt as I can with the roots and use the wire tool to support the plug into the hole in the pot, then just push down gently on the top of the plug - but it doesn't hurt the plant, just like Sman said above to prune the roots. Anytime there is root disturbance or damage best to cut off cleanly so new root hairs can emerge.

Once again, lookin good paul! just goes to show that you don't need all the technical grow stuff to get some seedlings poppin. Good germ rates, I was wondering about the orchid mix, glad to see that it was as I suspected. Good.. but not the best. Dude.. just like you most of my techniques are stolen from people from THP and you just made me add another to my list.. The Wire Tool. That things money! After potting up 208 plants with my fingers.. I couldn't be happier to find your idea! I'll be doing that next year :)

Glad your looking for a fan, not only will it bring down your temps but more importantly it will get your plants ready for the outdoors and the weather that awaits them. Just like others have said, I appreciate the detailed glog. I've been trying to do the same :)

But I want the technical grow stuff : ) I don't really have room for it anyway. haha. I started with some pretty good seeds; I need to determine which varieties can survive in the growing environment in my garage and greenhouse, and then have at those. I'm ecstatic that you like the wire tool idea. I still owe about 100 good ideas to the forum! Even with a slick tool, 208 is a honkin' lot of transplants, my man :cool:

You are very kind. It's interesting to see everyone's take on grow logs. If we keep borrowing each other's ideas, pretty soon all of them will look the same! Easy to lose an hour or two just looking at all the cool pictures, not to mention the wealth of pepper lore! I wish I could get to them all more often.
 
Back
Top